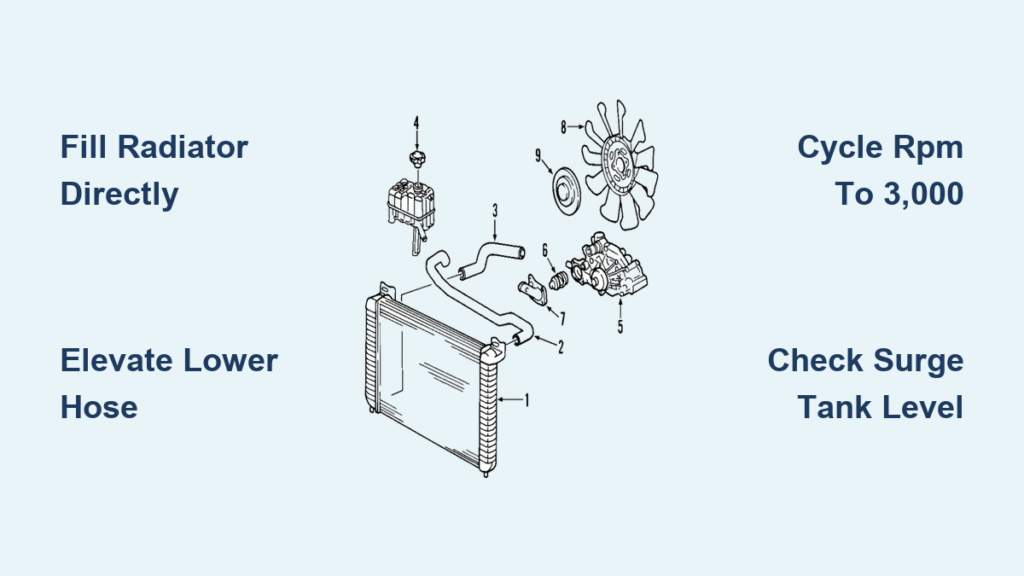
Your Silverado’s temperature gauge climbs into the red, or your heater blows cold air right after a coolant flush. Before you assume the worst, check for trapped air. Air pockets in the cooling system block coolant flow and mimic the symptoms of a failed head gasket or bad thermostat. Learning how to burp a Silverado cooling system saves you from misdiagnosing a simple problem as a catastrophic one. This guide covers the exact field-tested methods used on GM 4.8L, 5.3L, 6.0L, and 6.2L engines to fully purge air and restore proper circulation.
Use the Correct Coolant Type
Stick to DEX-COOL Only
Always fill your Silverado with DEX-COOL (orange) coolant. This formula is engineered specifically for GM engines to prevent corrosion, scaling, and gasket degradation. Using green, universal, or non-Dex-Cool fluids causes chemical incompatibility, which leads to gel formation, clogged passages, and premature water pump failure. For best results, use pre-mixed 50/50 coolant to avoid concentration imbalances. If you must mix concentrate, use distilled water only, since tap water introduces minerals that form damaging deposits over time.
Avoid Coolant Mixing
Never mix coolant types. Even small amounts of incompatible fluid destabilize the entire system. If you are unsure what was previously installed, flush the system thoroughly before refilling. A contaminated mix often appears brown or sludgy and must be replaced immediately.
Prepare the Vehicle Properly
Ensure the Engine Is Cold
Begin only when the engine is completely cool. Opening the system under pressure risks severe burns from hot coolant spray. Wait at least 2–3 hours after shutdown, or overnight for full safety.
Park on Level Ground
Park the truck on a flat, level surface. An uneven stance prevents accurate fluid level readings and allows air to settle in corners, making it harder to purge.
Gather Required Tools
You will need:
– DEX-COOL coolant (50/50 pre-mixed)
– Spill-free funnel kit (optional but recommended)
– Wrenches or pliers for hose clamps
– Blue RTV sealant (for resealing housings)
– Catch pan for spills
– Gloves and eye protection
Fill Through the Radiator, Not the Surge Tank
Why Surge Tank Filling Fails
Most DIYers make the critical mistake of filling only the surge (overflow) tank. This method rarely fills the radiator or engine block completely. The surge tank feeds the radiator after the system is already full, so it is not a primary fill point. Attempting to fill via the surge tank often traps air in the upper engine and heater core.
Direct Radiator Fill Is Essential
Remove the radiator cap (only when cold) and pour coolant directly into the radiator neck until it is nearly full. This ensures the radiator core is saturated before starting the engine. Leave space for expansion and do not overfill.
Method 1: Hose Elevation for Complete Burp

Disconnect the Radiator-to-Water Pump Hose
Locate the lower radiator hose connected to the water pump. Using pliers or a wrench, loosen the clamp and disconnect the hose from the water pump side. Fold the open end of the hose upward so it becomes the highest point in the cooling system. This creates a natural air escape route.
Pour Coolant into the Engine via the Hose
With the hose elevated, pour coolant directly into the open end. Coolant flows into the engine block and displaces trapped air. Watch the water pump outlet. You will see coolant begin to seep out once the block is full. Continue until a steady stream flows without bubbles.
Reconnect the Hose Quickly and Fill the Radiator
Once coolant flows cleanly from the pump, immediately reconnect the hose to the water pump. Then disconnect it from the radiator side and pour more coolant into the radiator inlet. Refill until coolant begins to overflow, then reattach the hose securely. This sequence prevents air from rushing back in.
Method 2: RPM Cycling to Force Air Out
Start the Engine with a Loose Surge Cap
With the surge tank cap loosely installed (not tightened), start the engine. Set the heater to maximum heat and highest fan speed. This opens the blend door and ensures coolant circulates through the heater core.
Cycle RPMs to 3,000
Let the engine idle for one minute, then increase the throttle to 3,000 RPM for 30 seconds. Repeat this cycle. The water pump’s increased speed pushes coolant through high points, forcing air toward the surge tank.
Repeat Until the Thermostat Opens
Continue cycling until the engine reaches operating temperature (gauge at center). You will see coolant moving in the surge tank, which means the thermostat has opened. Shut off the engine, let it cool slightly, then remove the cap carefully and top off the surge tank to ½ inch above the “Cold Full” line.
Method 3: Use a Spill-Free Funnel Kit
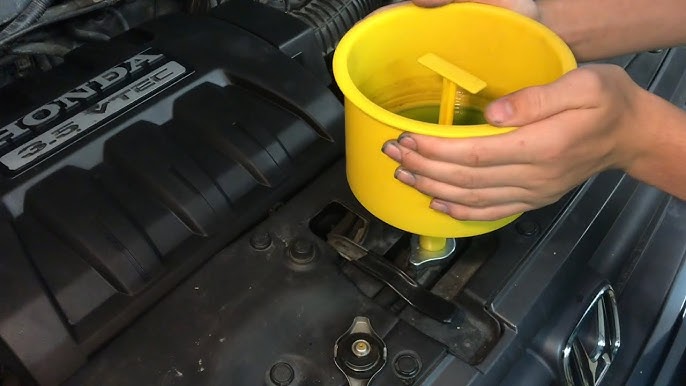
Install the Funnel on the Radiator Neck
Remove the radiator cap and insert the rubber seal from your spill-free funnel kit. Attach the funnel securely to the radiator neck. This keeps the system open to atmosphere while preventing spills.
Fill the Funnel and Monitor Bubbles
Pour coolant into the funnel until it is about one-third full. Start the engine with the heater on max. As the system warms, air bubbles rise through the funnel. This is visual proof of air being purged.
Remove the Funnel Without Sucking in Air
When bubbles stop and the level stabilizes, squeeze the upper radiator hose to create a vacuum, then quickly remove the funnel and replace the radiator cap. This prevents air from being drawn back in.
Handle Air Locks with Pre-Bleeding

Loosen the Top Radiator Hose Clamp
If the system will not accept coolant, an air lock is likely blocking flow. Loosen the clamp on the top radiator hose slightly. Place a catch pan underneath to collect drips.
Use the Sideways Pour Technique
When adding coolant, tilt the coolant jug sideways as you pour. This prevents glugging and ensures a smooth, bubble-free flow. Gently wiggle the top hose to help dislodge trapped air.
Stabilize the Level Before Starting
Keep adding coolant until the surge tank level stops dropping and stabilizes near “FULL.” Once steady, tighten the hose clamp. Start the engine for 5–10 minutes to circulate and expel micro-bubbles.
Diagnose Common Post-Bleed Issues

No Heat After Burping
If the heater still blows cold:
– Air in heater core: Disconnect the heater core line (often near firewall), fill until coolant flows out, then reconnect.
– Blend door failure: Listen for actuator noise when adjusting temperature. No sound may mean a dead motor or stuck damper.
– Stuck-open thermostat: Engine takes too long to warm up. Replace if necessary.
Overheating or Surge Tank Overflow
Common causes include:
– Pinched heater hose: Check under plastic manifold covers. Hoses can get crushed during reassembly.
– Improper seal: A thermostat housing without gasket or RTV can suck in air when cooling.
– Head gasket leak: Continuous bubbles in the surge tank when hot may indicate combustion gases entering coolant.
System Will Not Accept Coolant
If fluid stops flowing:
– Air lock: Use the pre-bleed method with a loosened hose clamp.
– Pour too fast: Slow down and use the sideways pour method.
Final Checks and Verification
Top Off the Surge Tank Correctly
After bleeding, with the engine off and cool, fill the surge tank to ½ inch above the “Cold Full” mark. Do not overfill. Thermal expansion pushes excess out when hot.
Perform a Leak Inspection
Check all hose connections, the radiator, water pump, and thermostat housing for leaks. A small drip leads to a major loss over time.
Take a Test Drive
Drive at least 5 miles, including highway speeds. Monitor the temperature gauge and heater output. Idle temperatures may run higher than driving temps due to reduced airflow. This is normal if it stabilizes.
Recheck After Cool-Down
Once the engine cools completely, recheck the surge tank level. It will likely drop slightly. Top off as needed to the correct mark.
Pro Tips for Long-Term Success
Replace Hoses Over 100K Miles
Old radiator hoses become brittle and prone to collapse or leaks. Replace them during cooling system work to prevent future failures.
Flush the System When Contaminated
If old coolant was rusty or sludgy, flush the engine block until clear water runs out. Use a reverse flush kit for best results.
Bleed on an Incline for Rear Climate Models
Silverados with rear heat/AC have longer coolant lines. Drive uphill at 2,500 RPM in first gear to help push air toward the surge tank.
Use Blue RTV on Critical Seals
When reinstalling thermostat housings or manifold covers without gaskets, apply a thin bead of blue RTV sealant. Let it cure for 15 minutes before refilling.
Frequently Asked Questions About Burping a Silverado Cooling System
Why does my Silverado overheat after a coolant flush?
Trapped air pockets block coolant circulation, causing localized hot spots. The engine cannot dissipate heat efficiently until the air is purged through a proper bleeding process.
Can I just fill the surge tank and drive?
No. The surge tank is not a primary fill point. Filling only the surge tank leaves the radiator and engine block partially empty, trapping air that leads to overheating and poor heater performance.
How long does it take to burp a Silverado cooling system?
Plan for 30–60 minutes depending on the method used. Hose elevation takes longer but provides the most complete air removal. RPM cycling is faster but may require multiple attempts.
Do I need to remove the thermostat to bleed the system?
No. In fact, removing the thermostat disrupts the designed flow path. The thermostat must open during the process to allow coolant to circulate through the radiator.
What happens if air remains in the cooling system?
Persistent air pockets cause overheating, reduced heater output, and potential engine damage. The water pump pushes coolant and air inconsistently, creating hot spots in the cylinder heads.
Is DEX-COOL required for all Silverado models?
Yes. GM specifies DEX-COOL (orange) for all 4.8L, 5.3L, 6.0L, and 6.2L engines. Using other coolant types causes chemical reactions that damage gaskets, seals, and internal passages.
Key Takeaways for a Cool-Running Silverado
Successfully burping your Silverado cooling system comes down to three critical actions: fill directly through the radiator, create a high-point vent for air to escape, and run the engine until the thermostat opens. Avoid the surge tank-only mistake, use DEX-COOL exclusively, and always keep the heater on max during the process. Air pockets mimic serious failures, but patience and the right method eliminate them completely. Start with a cold engine, gather your tools, and choose the hose elevation method for the most thorough bleed on your first attempt.