
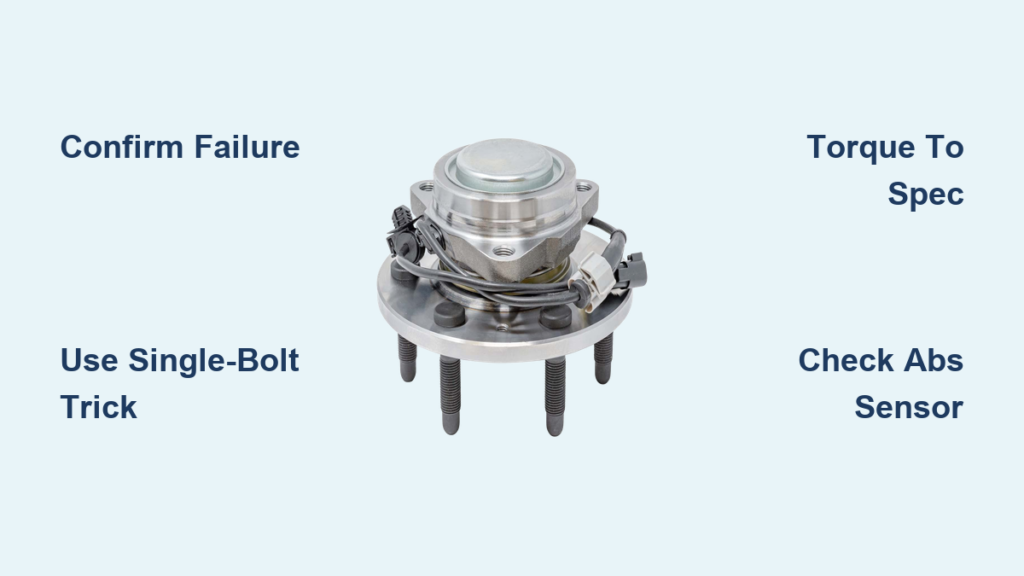
A grinding or humming noise from your Chevy Silverado that gets louder with speed is a classic sign of a failing front wheel bearing. Ignoring it can lead to ABS problems, uneven tire wear, or even a seized wheel in extreme cases. The good news is that replacing the front wheel bearing hub assembly on a 1999–2020 Silverado is a realistic DIY project with the right tools and a clear plan.
This guide covers everything you need to know about how to change wheel bearing on Chevy Silverado trucks, from confirming the diagnosis to final torque specs. Whether you drive a 2004 classic or a 2018 model, the process applies across multiple GM platforms, including Sierra, Tahoe, and Yukon.
Confirm Wheel Bearing Failure Before You Start
Misdiagnosing the noise can waste hours and money. Before you lift the truck, rule out tires, brakes, and CV joints.
Listen for the Right Noise Pattern
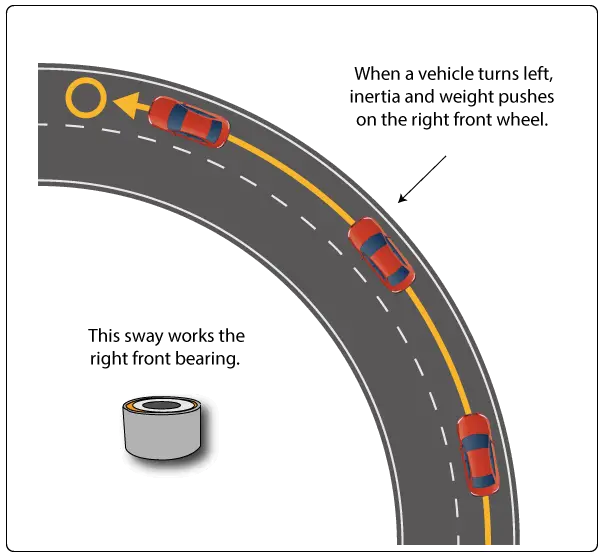
A failing front wheel bearing makes a rhythmic low-frequency grinding or growling that rises with speed. It does not change when you lightly apply the brakes. To pinpoint the side:
– Drive at 30–50 mph and turn gently left, then right.
– If the noise grows louder when turning right, the left bearing is suspect (more load on the outer wheel).
– If it worsens when turning left, the right bearing is the likely culprit.
Check for Excessive Wheel Play
- Lift the front of the truck and secure it on jack stands.
- Grasp the tire at 12 and 6 o’clock and rock it up and down.
- Any movement greater than 1/8 inch points to bearing wear.
- Repeat at 3 and 9 o’clock. Top-to-bottom play is bearing-related; side-to-side play usually indicates tie rod or ball joint issues.
Watch for the ABS Warning Light
A damaged ABS tone ring inside a worn hub can trigger the ABS light. If the light appears alongside humming or grinding, the hub assembly almost certainly needs replacement.
Gather Tools and the Right Replacement Hub
Missing a specialty tool mid-job is frustrating. Prepare everything in advance.
Essential Tools Checklist
- 35mm socket for the axle nut
- 15mm socket and wrench for the three hub bolts
- 18mm and 19mm sockets for brake components
- T30 Torx driver for the rotor screw (2007–2013 models)
- Torque wrench for final assembly
- Breaker bar with a pipe extension for seized nuts
- Floor jack and jack stands
- C-clamp to compress caliper pistons
- Hammer, punch, and chisel
- ½-inch impact gun (optional but helpful)
- Wire brush, brake grease, anti-seize, and mineral spirits
Choose a Quality Hub Assembly
Buy a complete front wheel bearing hub assembly, not just the bearing. Trusted brands include Duralast, Moog, NAPA, Timken, and TRQ. Confirm the part matches your model year and drivetrain (2WD vs 4WD). Most units run $110–$160 and often include a lifetime warranty.
Remove the Wheel and Brake Components
This stage is consistent across most Silverado generations.
Take Off the Wheel Safely
- Park on level ground and engage the parking brake.
- Loosen the lug nuts slightly while the truck is still on the ground.
- Lift the front end with a floor jack.
- Position jack stands under the frame before going underneath.
- Remove the lug nuts and wheel.
Unmount the Brake Caliper
- Remove the two caliper bolts using a 19mm socket (2007–2013 models).
- Slide the caliper off the rotor.
- Hang the caliper with wire or a brake hanger. Never let it hang by the brake hose, as this can crack the line.
Remove the Caliper Bracket and Pads
- Use an 18mm socket to remove the two bracket bolts.
- Lift the bracket off and set it aside.
- Remove the brake pads and store them safely.
Pull Off the Rotor
- On 2007–2013 models, remove the T30 Torx screw in the rotor face.
- Tap the rotor gently with a rubber mallet if it sticks.
- Slide the rotor off the hub.
Disconnect the ABS Sensor and Hub Bolts
The hub is now exposed. Next, disconnect the electrical and mechanical fasteners.
Unplug the ABS Sensor
- Locate the ABS connector behind the hub.
- Press the release tab and pull the connector apart.
- Remove any clips or small bolts securing the wire to the knuckle.
- Route the wire aside without pulling or pinching it.
Remove the Three Hub Bolts
- Find the three 15mm bolts on the back of the steering knuckle.
- Remove them with a ratchet or impact gun.
- If the bolts are seized, apply penetrating oil and let it soak before trying again.
Break Loose the 35mm Axle Nut
This large central nut secures the hub to the axle spline and is torqued to 150–180 ft-lbs from the factory.
- Fit a 35mm socket onto the axle nut.
- Attach a breaker bar and add a pipe extension for extra leverage.
- Hold the axle still with a second wrench on the flat spot if it tries to rotate.
- Remove the nut and washer.
Separate the Hub from the Spindle
This is the toughest part of the job. Corrosion often welds the hub flange to the knuckle.
Use the Single-Bolt Separation Trick
This method creates hydraulic-style pressure without damaging the knuckle.
- Punch out one lug stud using a hammer and chisel.
- Insert a ½-inch bolt through the empty hole from the front.
- Thread a nut onto the bolt behind the hub flange.
- Tighten the nut until the bolt head presses against the spindle while the nut pulls the hub forward.
- Back the nut off 1–2 turns, then retighten. Repeat until the hub pops free.
Try the Four-Bolt Method as a Backup
- Remove all four lug studs.
- Replace them with four ½-inch bolts and nuts.
- Tighten evenly in a star pattern to push the hub out.
Apply Heat if the Hub Still Won’t Budge
Heat the hub flange area with a propane torch for 1–2 minutes to expand the metal and break rust bonds. Avoid heating to a red glow.
Clean the Knuckle and Spindle Thoroughly
Debris on the mounting surface causes misalignment and early bearing failure.
- Scrape off all rust, grease, and corrosion from the knuckle bore and spindle.
- Use a wire brush or die grinder for stubborn buildup.
- Wipe clean with a damp rag and mineral spirits.
- Inspect the spindle for deep scoring or pitting. Minor marks are acceptable, but deep grooves may require knuckle replacement.
Install the New Hub Assembly

Clean hands and surfaces ensure a proper fit and long service life.
Prep the New Hub
- Apply a thin layer of anti-seize or silicone paste to the hub flange and spindle contact area.
- Never grease the ABS encoder ring. Oil on the magnetic surface triggers sensor errors.
- Thread the ABS wire through the backing plate if it is not pre-routed.
Slide the Hub into Place
- Align the hub with the axle spline and slide it into the knuckle.
- Line up the ABS sensor opening.
- Insert the three 15mm hub bolts from the back and start them by hand.
- Tighten in a star pattern, then torque to 133 ft-lbs.
Reinstall the Axle Nut
Place the washer and 35mm axle nut onto the axle. Torque to 156 ft-lbs, which falls within the common 150–180 ft-lbs range. Confirm the hub spins freely with no binding.
Reassemble the Brake System

Reverse the disassembly steps with attention to torque specs.
Refit the Rotor and Caliper Bracket
- Slide the rotor onto the hub and secure it with the T30 Torx screw (2007–2013 models).
- Position the caliper bracket and install the two bolts.
- Torque the bracket bolts to 100 ft-lbs.
Install the Brake Pads
- Clean pad contact points with mineral spirits.
- Apply brake grease to the pad ends where they touch the bracket.
- Insert the rear pad first, then the front pad.
- Use a C-clamp to compress the caliper pistons back into the housing.
Mount the Caliper
- Place the caliper over the pads.
- Install the two mounting bolts and torque to 50 ft-lbs.
Final Connections and Wheel Installation
- Reconnect the ABS sensor until the connector clicks.
- Route the wire through the original clips, avoiding sharp bends.
- Mount the wheel and hand-tighten the lug nuts.
- Lower the truck until the tire just touches the ground.
- Torque the lug nuts to 110 ft-lbs in a star pattern.
Test and Verify the Repair
Skipping the verification step risks driving on an unsafe assembly.
- Fully lower the truck and remove the jack stands.
- Pump the brake pedal 5–10 times to restore hydraulic pressure.
- Drive at 10–15 mph in a safe area and listen for grinding, clicking, or scraping.
- Check the dashboard for any ABS warning lights.
If the ABS light stays on after the test drive, inspect for a pinched sensor wire, a dirty encoder ring, or a loose connector.
Pro Tips for a Long-Lasting Repair
- Always use a torque wrench on hub bolts, the axle nut, and lug nuts. Under-tightening allows movement, and over-tightening can crack the knuckle.
- Apply anti-seize to the hub-to-knuckle interface to make future removal easier.
- Replace bearings in pairs only if both show wear. Otherwise, a single replacement is fine.
- Save the old hub if the retailer offers a core refund.
Frequently Asked Questions About Changing Wheel Bearings on a Chevy Silverado
How long does it take to change a wheel bearing on a Chevy Silverado?
For a DIYer with experience, the job typically takes 2–4 hours per side. First-timers may need 4–6 hours, especially if the hub is heavily corroded and requires extra effort to separate.
Do I need to replace both wheel bearings at the same time?
Not necessarily. Replace only the failed side unless the other bearing shows similar symptoms. At high mileage, both may wear out around the same time, so inspect the opposite side during the repair.
Can I drive with a bad wheel bearing?
Short trips at low speed are possible, but it is not safe. A failing bearing can damage the ABS tone ring, cause uneven tire wear, and in extreme cases lead to wheel seizure. Replace it as soon as possible.
What size socket do I need for the axle nut on a Silverado?
A 35mm socket is required for the main hub/axle nut on most 1999–2020 Silverado and Sierra models. A breaker bar and pipe extension are usually needed to break it loose.
Why won’t my hub come off the spindle?
Corrosion fuses the hub flange to the knuckle over time. The single-bolt separation method described above is the most reliable way to break this bond without damaging the steering knuckle. Heat from a propane torch can help in stubborn cases.
Key Takeaways for Changing Your Silverado’s Wheel Bearing

Learning how to change wheel bearing on Chevy Silverado trucks saves $300 or more in shop labor and gives you full control over part quality. The most important steps are confirming the diagnosis, using the single-bolt separation trick to free a corroded hub, and torquing every fastener to spec. Take your time with surface cleaning and ABS sensor handling to avoid repeat repairs.
Gather your tools, order a quality hub assembly, and set aside a full afternoon. Once you finish the job, your Silverado will run quieter, handle smoother, and stay safe for many miles to come.



