
Your Silverado AC not blowing cold air is one of the most reported complaints among 2014–2020 owners. You press the button, hear the fan kick on, and feel something, but it never gets truly cold. Even worse, the truck may still push air around 48–50°F, which technically meets factory specs but feels underwhelming compared to older models.
The good news? Most cooling problems trace back to a handful of fixable issues, not a failed compressor. This guide walks you through a precise diagnostic sequence, from simple settings checks to pressure testing and component replacement, so you can restore real cold air without wasting money on parts you don’t need.
Verify Basic A/C Settings Before Any Repairs

Before touching tools or spending money, rule out the simple stuff. Many “broken” A/C systems are actually working fine, just configured wrong.
Switch to Recirculation Mode
Fresh air mode constantly pulls hot, humid outside air into the cabin. This fights against your cooling efforts and prevents the evaporator from reaching peak performance. After the initial cooldown, switch to recirculation mode to seal off outside air and reuse already-cooled cabin air. This single change often improves output by several degrees.
Set Climate Control to LO and Max Fan
Auto climate systems modulate output based on sensor input, which means they rarely run at full capacity. To test maximum cooling potential, set the temperature to LO and the fan to its highest setting. This bypasses automatic logic and forces the compressor and blower to work at peak output. If cold air appears here but not in auto mode, your system is fine; the calibration just needs adjustment.
Clear Dashboard Obstructions
The sunload sensor and cabin temperature sensor sit on or near the dashboard. Items like papers, phone mounts, or cold drinks can block these sensors, tricking the HVAC module into thinking the cabin is cooler than it actually is. The system then reduces cooling demand. Remove everything from the dash and retest.
Reset the HVAC Module to Clear Calibration Errors

Electrical glitches in the HVAC control module can cause inconsistent cooling, stuck blend doors, or incorrect temperature readings. A hard reset often resolves these phantom issues.
Disconnect the Battery for 10 Minutes
- Turn off the vehicle completely and remove the key.
- Open the hood and disconnect the negative battery terminal first, then the positive.
- Wait at least 10 minutes to fully discharge residual power from all control modules.
- Reconnect the positive terminal first, then the negative.
- Start the engine and let it idle for 3–5 minutes with the climate set to LO and max fan.
This forces actuators to recalibrate and clears temporary software errors. If cooling improves after the reset, the original problem was likely electrical, not mechanical.
Measure Vent Temperature and Calculate Delta T

You cannot fix what you have not measured. Guessing whether the air is “cold enough” leads to wasted repairs.
Check Actual Vent Output
Place a digital thermometer in the center vent and compare the reading to the outside ambient temperature.
- Ideal Delta T: A 20°F drop from ambient (80°F outside should produce 60°F or lower at the vent)
- GM Factory Spec: Designed output of approximately 50°F; 48–49°F is common in real-world conditions
- Problem Indicator: Anything above 55°F in hot weather suggests an underlying issue
If your Delta T is less than 15°F, proceed to mechanical diagnostics.
Inspect the Blower Motor and Airflow Path
Cold refrigerant means nothing if the blower cannot push enough air into the cabin. Airflow volume is just as critical as refrigerant temperature.
Replace the Cabin Air Filter
A clogged cabin air filter chokes airflow, reducing the total heat exchange capacity. Even if the filter looks clean, microscopic dust buildup restricts volume.
- Replacement interval: Every 15,000–30,000 miles
- Location: Behind the glovebox or under the dash (check your owner’s manual)
- Pro Tip: This is the cheapest and easiest fix; do it first
Listen for Blower Motor Failure
A failing blower motor produces distinctive symptoms:
- Popping or thumping noises when changing fan speeds
- A vacuum effect in the cabin (ears popping, doors hard to close, speaker distortion)
- Noticeably reduced airflow even on the highest setting
These signs indicate the squirrel cage inside the motor is damaged or unbalanced. Cleaning rarely helps; replacement is the only reliable fix.
Diagnose Blend Door Actuator Failure

The blend door actuator is one of the top causes of warm air in 2014–2020 Silverados. It controls whether air flows through the evaporator (cold) or the heater core (hot). When it fails, air gets stuck on the hot side.
Recognize the Symptoms
- Temperature does not change when you adjust the dial
- Warm air blows even on the LO setting
- In dual-zone models, one side is significantly colder than the other
Test with a Scan Tool
An advanced OBD2 scanner that reads HVAC live data can compare the commanded blend door position against the actual position. If these values do not match, the actuator is binding or has failed internally. Without a scanner, remove the actuator and manually rotate it. Stiffness or grinding noises confirm replacement is needed.
Replace the Faulty Actuator
- Part cost: Around $25 for aftermarket options
- Location: Top of the HVAC housing on the driver’s side
- Time required: 30–60 minutes for most models
- Pro Tip: Mark the door position before removal to avoid misalignment during reinstallation
Check Condenser and Radiator Fan Operation
The condenser must reject heat to the outside air. At idle or in slow traffic, the radiator fans do most of this work. If they fail, cooling collapses.
Confirm Both Fans Engage at High Speed
With the A/C on and the engine idling in hot conditions, both radiator fans should run at high speed. If only one runs, or both stay slow, heat cannot escape the condenser and high-side pressure spikes.
Diagnose Fan Failure
Common causes include:
- Blown fuse or faulty relay
- Damaged wiring harness (rodent damage or corrosion)
- Failed fan motor
- Faulty pressure switch or PCM signal
Start by checking fuses. If those are good, use a scan tool to command the fans on. If they do not respond, test for 12V power at the motor connector.
Test Refrigerant Pressure with Manifold Gauges
Low refrigerant is a frequent suspect, but it is not the only cause. Pressure testing tells you definitively whether the system is properly charged and functioning.
Static Pressure Test (Engine Off)
After the system sits for at least 10 minutes at 80°F ambient:
- Both high and low-side pressures should read approximately 90 psi
- Readings below 80 psi suggest undercharging or a leak
- Readings above 100 psi suggest overcharging or contamination
Running Pressure Test (Engine On, A/C at Max)
At 80°F ambient with the A/C running on maximum:
- Low side: Approximately 36 psi
- High side: Approximately 205 psi
Interpret the Results
| Pressure Reading | Likely Cause |
|---|---|
| Low on both sides | Undercharged system (leak present) |
| High high-side, normal low | Poor airflow (fan failure or condenser blockage) |
| Low high-side, high low | Compressor not pumping |
| Normal pressures, warm air | Blend door, airflow, or design limitation |
Never add refrigerant without testing first. Overcharging a properly charged system can damage the compressor.
Inspect and Clean the Condenser
The condenser sits in front of the radiator and is vulnerable to debris, bugs, and bent fins. Any blockage reduces its ability to reject heat.
Clean the Condenser
- Shut off the engine and allow it to cool completely.
- Use a garden hose or low-pressure washer to spray from the front (grille side), pushing debris through.
- For bent fins, use a fin comb to carefully straighten them.
Avoid high-pressure water, which can damage the soft aluminum fins.
Replace If Leaking or Internally Clogged
Signs that replacement is needed:
- Oil stains visible on the condenser surface
- System will not hold a charge after recharging
- Poor cooling persists even after cleaning
Condenser replacement requires professional evacuation and recharging by a licensed technician.
Evaluate Compressor Performance
The compressor circulates refrigerant through the entire system. If it fails, cooling stops entirely.
Check Clutch Engagement
With the A/C on, the compressor clutch should engage and spin with the pulley. If it cycles rapidly or does not engage at all, suspect:
- Low refrigerant pressure
- Failed clutch coil
- Internal compressor wear
Listen for Unusual Noises
- Grinding or squealing: Bearing failure
- Metal shavings in the refrigerant: Catastrophic internal damage requiring full system flush and replacement
Confirm Electrical Supply
Test for 12V at the compressor connector, verify ground integrity, and check relay operation. If no power is present, trace the wiring back to the PCM or A/C relay.
Understand Factory Design Limitations
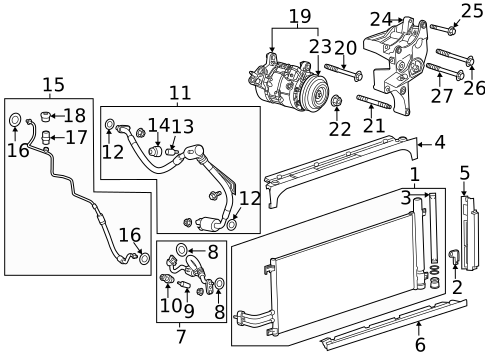
Some “warm A/C” complaints are not defects; they are engineering trade-offs. Understanding this prevents you from chasing a problem that does not exist.
Why Newer Silverados Feel Less Cold
- Low refrigerant capacity: Only 1.7 lbs, less than older models
- E-fan modulation: Fans run slower to improve fuel economy, reducing heat rejection
- HVAC calibration: Prioritizes comfort balance over maximum cooling
- Target outlet temperature: Approximately 50°F, which feels “cool” but not “cold”
Owners of 2014–2016 models commonly report 48–49°F output. This is within spec but underwhelming compared to expectations.
Compare to Older Models
A 2004–2006 Silverado could hit 42–44°F at the vents due to larger condensers, higher refrigerant charges, and less sensor-based modulation. The newer system is more efficient, but not as aggressively cold.
Follow the Diagnostic Action Plan
Use this sequence to avoid wasted time and money. Each step builds on the previous one.
Step 1: Quick Checks
- Set to recirculation and LO
- Remove all dashboard items
- Replace the cabin air filter
- Listen for blower motor noise
Step 2: Reset the HVAC Module
- Disconnect the battery for 10 minutes
- Reconnect and recalibrate with A/C on max
Step 3: Measure Cooling Output
- Check vent temperature and Delta T
- If the drop is less than 20°F, proceed to mechanical checks
Step 4: Inspect Fans and Condenser
- Verify both fans run at high speed
- Clean the condenser from the front
Step 5: Pressure Test
- Check static and running pressures
- If abnormal, locate the leak or replace the faulty component
Step 6: Scan for Blend Door Issues
- Use a scan tool to verify actuator position
- If commanded and actual positions do not match, replace the actuator
Step 7: Consider Design Limits
- If pressures, airflow, and controls are all normal but output is 48–50°F, the system is working as designed
- Contact GM Customer Care to ask about calibration updates
Frequently Asked Questions About Silverado AC Not Blowing Cold Air
Why is my Silverado AC blowing warm air on one side but cold on the other?
This usually indicates low refrigerant or a failing blend door actuator. In dual-zone systems, unequal temperatures often point to the evaporator not being fully utilized, which happens when refrigerant levels drop.
How do I know if my Silverado blend door actuator is bad?
The most common signs are air temperature not changing when you adjust the dial, warm air on the LO setting, or one side being significantly colder than the other in dual-zone models. A scan tool can confirm by comparing commanded versus actual actuator position.
What should the vent temperature be in a properly working Silverado?
GM designs the system to output approximately 50°F at the vents. Real-world readings of 48–49°F are normal. A Delta T of about 20°F from ambient temperature indicates proper function.
Can I just add refrigerant to fix my Silverado AC?
Only if pressure testing confirms the system is low. Adding refrigerant to a properly charged system can damage the compressor. Always test first and find any leaks before recharging.
Why does my 2015 Silverado AC not get as cold as my old 2005 model?
Newer Silverados use less refrigerant (1.7 lbs), smaller condensers, and electric fans that modulate for fuel efficiency. These design choices reduce peak cooling output compared to older, less efficient systems.
How much does it cost to fix a Silverado AC that is not blowing cold air?
Costs vary widely. A cabin air filter is under $30. A blend door actuator is around $25 for the part plus 30–60 minutes of labor. Compressor or condenser replacement can run $800–$1,500 or more, including professional evacuation and recharging.
Key Takeaways for Fixing Your Silverado AC
Start with the simplest fixes: verify your settings, clear dashboard obstructions, and replace the cabin air filter. These steps resolve a surprising number of complaints. If cooling is still weak, perform the 10-minute battery reset to clear HVAC calibration errors.
For persistent warm air, measure vent temperature and run a pressure test before replacing any major components. Blend door actuators, blower motors, and condenser blockages are far more common culprits than compressor failure. And remember, if your truck outputs 48–50°F air with proper pressures and full airflow, the system may simply be meeting GM’s efficiency targets. In that case, contacting GM Customer Care about potential calibration updates is your best next step.



