
Adding a backup camera to your Chevy Silverado is one of the smartest upgrades you can make, especially for towing, reversing trailers, or navigating tight job sites. Owners of 2007–2014 GMT900 platform trucks are in luck, because this generation is incredibly DIY-friendly when it comes to camera installations. Whether you want a budget-friendly license plate mount or a factory-style tailgate handle replacement, the process is straightforward with the right tools and knowledge.
This guide covers everything you need to know, from choosing the right camera type and gathering tools to wiring, routing, troubleshooting, and long-term maintenance. You’ll learn how to avoid common mistakes like water intrusion, electrical shorts, and poor image quality. Let’s get your Silverado backed up with confidence.
Choose the Right Camera Type
License Plate Mount Kits
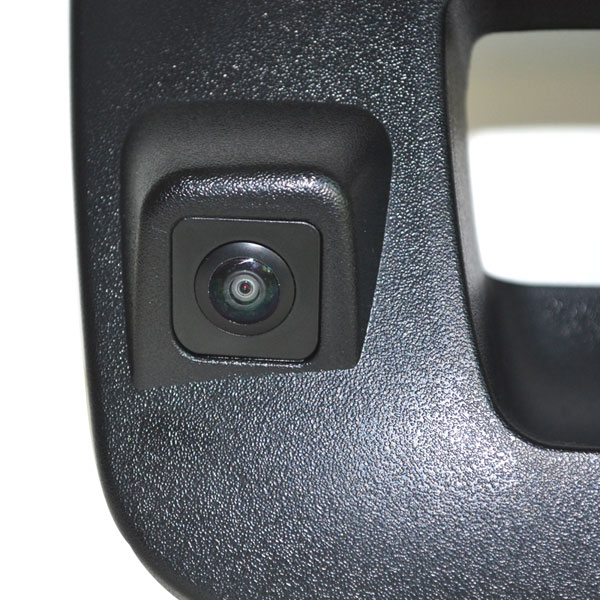
License plate mount cameras are the easiest and most non-invasive option. These kits typically include a 7-inch monitor, adhesive mounting hardware, and basic wiring. They work well if you already have an aftermarket radio and want a quick install. The camera activates automatically when you shift into reverse by tapping into your reverse light circuit. While functional, budget kits may struggle in low light and can look aftermarket on an otherwise clean truck.
Tailgate Handle Replacement
For a factory-integrated appearance, replace your tailgate handle bezel with a custom unit that houses the camera. Kits like the e-coconut Safe Driving Kit or CubbyCam include a pre-wired harness, weatherproof connectors, and key cylinder transfer hardware. The result looks OEM and performs reliably in all weather conditions. Installation requires removing the old bezel and routing wires through the tailgate, but the clean look is worth the extra effort.
Standalone CCD Cameras
If you want high image quality on a budget, consider a standalone CCD camera like the Pyle PLCM37FRV. Paired with an OEM Gentex 657 OnStar mirror or used display, this setup can cost under $200. Many GMT900 trucks have dormant wiring or compatible harnesses, so you may not need to run new cables. Always verify your radio or mirror supports video input before purchasing.
Gather Essential Tools and Materials
Required Tools List
You’ll need:
– 13mm socket wrench for tailgate bezel bolts
– Step bit drill for tailgate or bed routing
– Wire fishing tool or stiff wire
– Trim removal tools to avoid cracking dash plastics
– Wire strippers and crimpers
– Multimeter to test voltage and ground
– Razor blade for grommet entry
– Heat gun for heat shrink tubing
Sealing and Protection Supplies
Water intrusion is the number one cause of camera failure. Prevent it with:
– RTV silicone sealant for cab entry points
– Heat shrink tubing instead of electrical tape alone
– Weatherproof connectors
– Zip ties and adhesive clips for clean routing
Pro Tip: Lay down towels when removing the tailgate bezel to protect your paint. Use sawhorses if the tailgate is heavy or awkward to support.
Power and Wiring Basics
Identify Reverse Trigger Wire
The green wire at the tail light harness is your reverse power source. When the truck is in reverse, it delivers approximately 10.7 volts, just enough to trigger most cameras. Use a multimeter to confirm:
- Turn ignition to ON
- Shift into reverse
- Test green wire: should read ~10.7V
- Test black wire: should read 0V (ground)
Splice your camera’s red wire to this green wire using a butt connector or piercing probe. Connect the black wire to a clean metal ground point, such as an existing trailer wiring bolt.
Use a Smart Harness (Optional)
Some kits include a smart harness that eliminates the need for a purple trigger wire. These detect voltage changes automatically, reducing wiring complexity. If your kit includes a purple wire and you’re not using it, terminate it with heat shrink.
Tap Accessory Power for Live Monitoring
Want to view your camera while driving? Tap ignition-switched 12V power behind the radio for accessory mode. This lets you manually activate the camera feed via the radio menu, perfect for monitoring trailers or cargo. Locate a 12V wire in the dash fuse box (12V when key is ON, 0V when OFF) and connect your monitor’s power lead here.
Install License Plate Mount Camera

Mount and Route Wires
- Attach the camera to the license plate frame using adhesive pads or brackets. Ensure the lens is level and unobstructed.
- Route the cable along the bumper toward the rubber grommet near the rear cab entry point.
- From the outside, pull the wire through the grommet into the cab. Avoid sharp bends.
- Run the wire under the carpet or along existing harnesses to reduce visibility.
Connect to Reverse Circuit
- Remove the tail light assembly.
- Cut the protective sheath to expose the green (reverse) and black (ground) wires.
- Splice the camera’s red wire to the green wire, and black to black.
- Seal all connections with heat shrink tubing, not just electrical tape.
- Reinstall the tail light.
Mount Monitor and Finalize
- Use suction cups or adhesive pads to mount the 7-inch monitor on the windshield.
- Route power and video cables behind dash trim.
- Plug the RCA video cable into your radio’s CAM or VIDEO IN port.
- Power the monitor from the reverse circuit or accessory source as needed.
Replace Tailgate Handle with Camera
Remove Old Bezel
- Open the tailgate and locate the three 13mm bolts securing the handle bezel.
- Remove bolts and gently unclip the retaining tabs.
- Carefully pull the bezel out, disconnecting any wiring if present.
- Transfer the key cylinder from the old bezel to the new camera-integrated unit.
Route Wires Through Tailgate
Choose one method:
– Drill a hole in the bottom center of the tailgate using a step bit. Feed wires through and seal with silicone.
– Use factory drain holes (2009+ models): Feed a fish tape up from the passenger side and pull the harness through.
Install the top two bolts first, leaving the bottom bolt loose to relieve wire tension.
Run Wires to the Cab
- Route the harness under the bed, along the frame rail, past the axle and gas tank.
- Bring it up near the wheel well and through the body support panel.
- Locate the floor grommet near the emergency brake or shift boot.
- Use a razor blade to make a small slit, feed the wire through, and seal immediately with RTV silicone.
Connect to Radio or Mirror
- Fish the wire to the dash cavity.
- Plug into the CAM input on your radio.
- If using an OnStar mirror (2009+), connect to the X208 dash harness and install a compatible Gentex 657 mirror.
- Secure all wires with zip ties and reassemble the dash.
Upgrade Radio and Integrate Camera
Remove Dash Components Safely
- Gently pry off plastic trim around the center console. Plastic is brittle, so work slowly.
- Remove screws securing the radio and climate control panel.
- Disconnect AC control cables by releasing tabs.
- Unplug the radio harness by pressing locking tabs.
Install Factory Interface Adapter
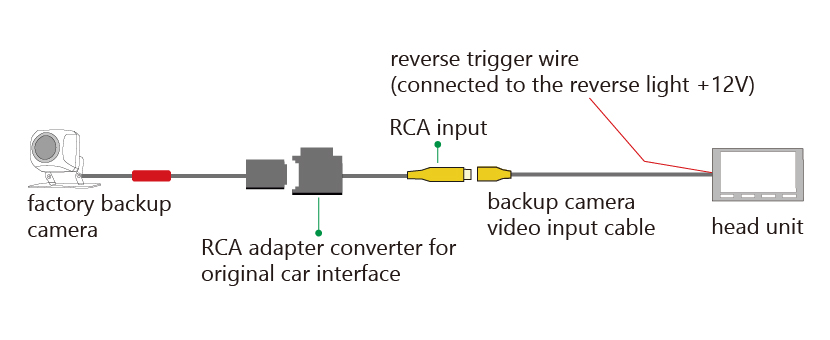
Critical Step: Without a factory interface adapter, you’ll lose steering wheel controls, seatbelt chime, door ajar warning, and turn signal sound. Match wire colors: white-to-white, green-to-green, red-to-red. Plug the adapter between the factory harness and new radio.
Run Camera Cable to Rear
- Feed the yellow RCA camera cable under the dash and carpet.
- Remove the driver’s side kick panel to access the rear seat area.
- Locate the factory plug under the carpet and pull the cable through from underneath.
- Route to the tail light and splice into the green (power) and black (ground) wires.
Final Radio Setup
- Connect the RCA cable to the radio’s CAM input.
- Attach the antenna adapter to the original vehicle connector.
- Bundle wires with loom and zip ties.
- Reinstall dash components.
Troubleshoot Common Issues
Camera Stays On at Night
Cause: Ambient light sensor interference or incorrect terminal connection.
Fix:
– Switch the trigger wire to a different terminal
– Isolate the ambient light sensor circuit
– Confirm all grounds are solid and corrosion-free
No Image or Black Screen
Check these in order:
1. Power: Verify 10.7V on green wire in reverse
2. Ground: Ensure black wire is on clean metal
3. Input: Confirm RCA is in CAM port
4. Settings: Enable camera input in radio menu (some require activation)
Water Leaks in Cab
Risk Points:
– Floor grommet entry
– Tailgate drill holes
Prevention:
– Apply RTV silicone liberally around grommets
– Use sealed connectors outside the cab
– Never leave gaps where wires enter the frame
Compatibility with OnStar Mirror
2009+ Silverados with auto-dimming OnStar mirrors can display camera feeds. Replace the OEM mirror with a Gentex 657 or compatible unit. Plug the camera harness into the X208 connector under the dash. No radio needed; the image displays directly on the mirror.
Optimize for Towing and Night Use

Enable Continuous Camera Monitoring
Wire the camera to accessory power instead of reverse-only. This lets you:
– Monitor trailer hitch alignment while driving
– Check cargo security
– View rear obstacles in tight spaces
Activate via the radio menu, which is ideal for off-roading or job site maneuvering.
Upgrade for Low-Light Visibility
Standard cameras fail at night. For reliable performance:
– Choose a CCD sensor camera for better low-light sensitivity
– Look for infrared (IR) or low-lux models
– Clean the lens regularly to prevent glare and fogging
Avoid cameras with visible LED rings. They attract bugs and reflect in rain.
Maintain Long-Term Reliability
Inspect Seals and Wiring
Every 6 months or after heavy rain:
– Check RTV seals at cab entry points
– Look for cracks or shrinking
– Reapply silicone if needed
Clean Camera Lens
Use a microfiber cloth and lens cleaner. Avoid paper towels, as they scratch. If condensation appears inside the housing, the seal has failed. Replace or reseal immediately.
Secure Underbody Wiring
Road debris and suspension movement can fray wires. Use:
– Adhesive clips every 12 inches
– Loom tubing for extra protection
– Zip ties away from sharp edges
Avoid routing wires near hot exhaust components.
Frequently Asked Questions About Chevy Silverado Backup Camera Installation
What tools do I need to install a backup camera on a Chevy Silverado?
You’ll need a 13mm socket wrench, step bit drill, wire fishing tool, trim removal tools, wire strippers, multimeter, heat gun, and RTV silicone sealant. These tools cover bezel removal, wire routing, electrical connections, and waterproofing.
How long does it take to install a backup camera on a Silverado?
A license plate mount install typically takes 2–4 hours. A tailgate handle replacement with full wire routing can take 4–6 hours depending on experience and whether you’re also replacing the radio.
Can I install a backup camera without replacing my factory radio?
Yes. License plate mount kits include a standalone monitor that mounts on your windshield. Alternatively, 2009+ Silverados with OnStar mirrors can display the camera feed on a compatible Gentex 657 mirror without a radio swap.
Where do I tap power for the backup camera?
The green wire at the tail light harness provides approximately 10.7 volts when in reverse. This is the standard trigger wire for camera activation. For continuous monitoring, tap an ignition-switched 12V source behind the radio.
Why does my backup camera stay on at night?
This usually happens due to ambient light sensor interference or an incorrect terminal connection. Switching the trigger wire to a different terminal or isolating the sensor circuit typically resolves the issue.
Will installing a backup camera void my truck’s warranty?
DIY installations may void warranties on affected components if improper wiring causes damage. However, camera installation generally doesn’t impact powertrain or major system warranties. Professional installation is recommended for complex integrations with factory safety systems.
Key Takeaways for Installing a Backup Camera on Your Silverado
Installing a backup camera on your 2007–2014 Chevy Silverado is a high-value upgrade that boosts safety and convenience. The three main approaches are license plate mount (easiest), tailgate handle replacement (cleanest look), and radio integration (most feature-rich). Success depends on proper wiring, thorough waterproofing with RTV silicone and heat shrink, and using the right tools for clean routing.
Before you start, verify your truck’s wiring compatibility and decide whether you want reverse-only activation or continuous monitoring for towing. After installation, inspect seals every six months and clean the lens regularly to maintain image clarity. Once your camera is up and running, use it daily to maximize visibility and prevent accidents.



