
Installing air bags on a Silverado is one of the most practical upgrades for truck owners who tow heavy trailers or haul substantial payloads. If your Silverado sags in the rear when you hitch up a fifth-wheel or load up the bed, helper springs can restore ride height, sharpen handling, and protect your suspension from premature wear. This guide walks you through the entire installation process using verified data from leading brands like Air Lift, Firestone, and Torque Parts.
You will learn how to safely lift your truck, mount upper and lower brackets, route air lines without leaks, set optimal pressure for any load, and troubleshoot common fitment issues. Whether you drive a 2019 Silverado 1500, a 2024 2500HD, or a lifted Trail Boss, this walkthrough covers the model-specific details that make the difference between a clean install and a frustrating weekend.
Prepare Your Silverado for Installation
Lift and Support the Vehicle Safely
Start by raising your Silverado with a floor jack or driving onto a hoist. You need enough clearance to lower the rear axle or let it hang freely during bracket mounting. Place jack stands under the frame rails, positioned as far back as possible to avoid interfering with your work area.
For lifted trucks or models with limited clearance, slide 4×4 wood blocks between the axle and frame to stabilize the suspension. Never work under a vehicle supported only by a jack. Confirm both tires are off the ground and the truck feels solid before you proceed.
Remove Factory Bump Stops
Locate the rear jounce bumpers mounted on the frame directly above the axle. These must come out to make room for the air spring upper brackets. Use a 10 mm socket or wrench to remove the mounting bolts.
If the bolts are corroded, apply penetrating oil and gently heat the bolt head to break the rust. On AT4, Trail Boss, and Z71 trims, you may also need to drill out internal spacers hidden inside the suspension housing. Keep any hardware you remove, since some pieces get reused for brake line brackets later.
Mount Upper and Lower Brackets
Install Upper Frame Brackets
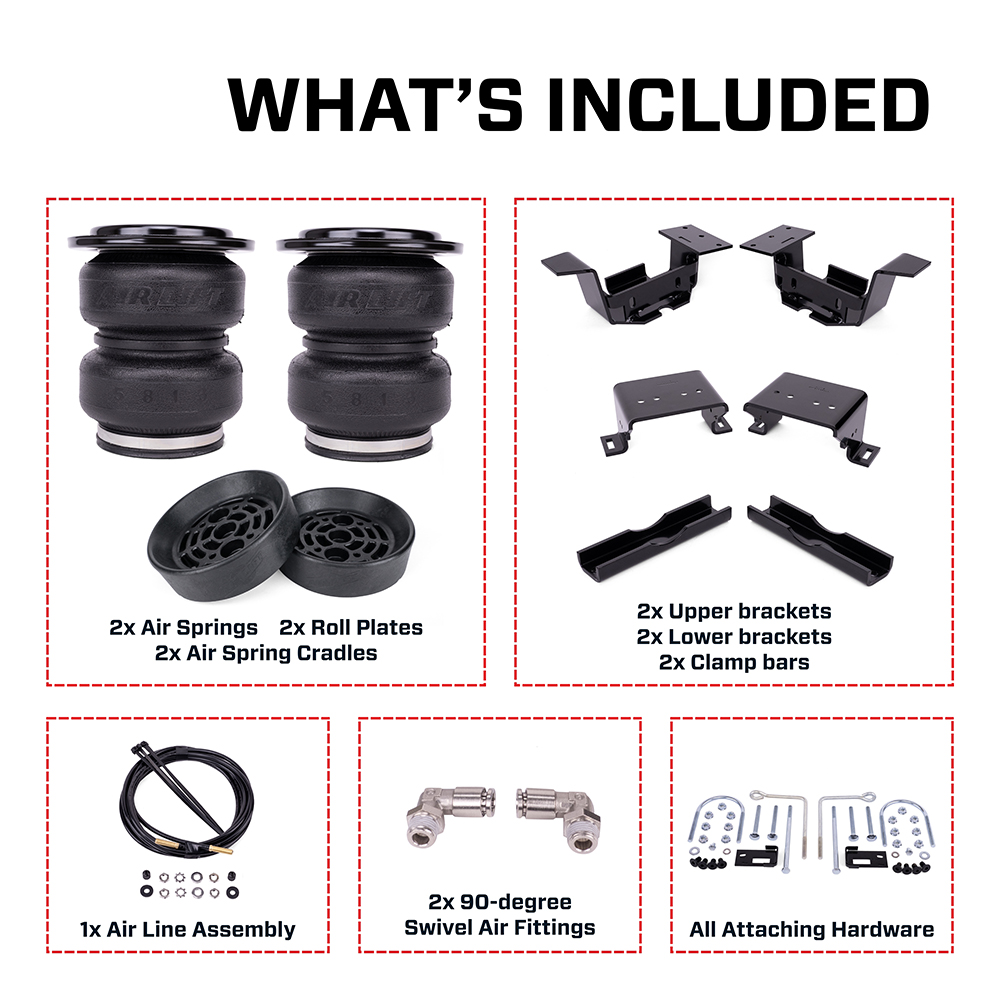
Position the upper mounting bracket where the factory bump stop was removed. For Air Lift LoadLifter 5000 systems, align the bracket flush with the frame rail and insert carriage bolts through the frame and bracket holes. Secure them with flange nuts, tightening finger-tight at first to allow for alignment adjustments.
On 2024–2025 models equipped with a fifth-wheel hitch bracket, some kits use self-tapping screws instead. Drill two pilot holes using the middle holes in the upper bracket as a template, then drive the screws in securely.
For Firestone Ride-Rite setups, upper plates are secured with flathead Allen screws. Thread them by hand first, then snug them down. Do not overtighten, or you risk stripping the threads.
Attach Lower Axle Brackets
Lower brackets mount directly to the axle housing. For Air Lift and Torque Parts kits, insert carriage bolts through the square holes in the lower bracket. Slide the roll plate onto the air spring, then use flathead socket cap screws through the innermost holes to connect the air spring to the lower bracket.
On 2019 and newer Silverado 3500HD models using the TR75613AS kit, you will need to build an upper mount assembly with a steel plate. Use a 7/32-inch Allen wrench and a 9/16-inch box wrench to assemble the components. Leave the lock nuts loose until you confirm proper alignment.
Align and Secure Clamp Brackets
Position the forward clamp bracket on the front side of the axle. The tab on this bracket must align with the hole in the lower bracket. Insert carriage bolts through the front and rear square holes, thread on the flange nuts, and tighten finger-tight.
Make sure the clamps seat properly under the jounce bumper strike plate before final torquing. If alignment is off, use a pry bar to gently lift the body and shift components into position. This step matters most on tight-clearance models.
Install the Air Springs
Insert and Secure Air Bags
Align the alignment pin on the air spring with the center hole in the upper bracket. For Torque Parts systems, insert a small Allen bolt to temporarily hold the air bag in place. Slide the air spring into position from the side, compressing the bag slightly if clearance is tight.
Once the air bag is seated, connect the swivel air fitting to the top of the air spring. Tighten it finger-tight plus 1.5 turns using a 13 mm wrench. Verify that the fitting height measures less than 7/8 inch. If it sits taller than that, tighten the fitting further until it drops below the threshold.
Handle Obstructions
On Silverado 3500HD and 2500HD models, the parking brake cable bracket often blocks the upper mount. Remove it and reposition it to avoid interference with the new hardware.
Check all brake lines, ABS sensors, and wire looms for safe routing. Reinstall wire harness guards using T40 Torx screws after the air springs are in place.
For 2024 2500HD models with exhaust routed near the axle, bend the heat shield tabs outward at 45 degrees. Position the shield over the exhaust with a small gap, then secure it with clamps bent to match the exhaust contour.
Route and Connect Air Lines

Cut and Prepare Air Tubing
Use a tubing cutter or sharp razor blade to cut your nylon or braided airline. Never use wire cutters, since they create jagged edges that compromise the seal. Cut at a perfect 90-degree angle and leave extra length, enough for one full coil, to allow for rework.
Trim only after you confirm the final routing path. Braided stainless steel lines cannot be re-cut once installed, so measure precisely before you commit to a length.
Install Fittings and Seals
For push-connect fittings, slide the inner sleeve onto the tube and push firmly until it clicks into place. Pull back slightly to confirm the connection is secure.
For threaded fittings, apply Teflon tape to the threads and avoid orange thread sealant, which can clog fittings over time. Tighten swivel fittings finger-tight plus 1.5 turns. For hex nuts on braided lines, tighten finger-tight, then use two wrenches to turn one flat (1/6 turn).
Use brass T-fittings to combine dual lines into a single feed. When passing a T-fitting through a block or frame rail, secure it with washers and a locknut to prevent the plastic from cracking under pressure.
Secure and Protect Air Lines
Choose a Safe Routing Path
Route your air lines to avoid heat sources, moving parts, and sharp edges. On the driver’s side, run the line between the spare tire and brake line, then up past the bump stop area. On the passenger side, route between the axle, spare tire, and exhaust, going over the crossmember to stay clear of exhaust heat.
If any line sits within 3 inches of the exhaust, wrap it with heat insulation to prevent premature failure.
Anchor Lines Every 6–8 Inches
Use zip ties to secure air lines to exhaust hangers, frame rails, and factory mounting points. Leave slack in the lines by coiling excess length in a safe location. This slack allows the suspension to travel without stretching or tearing the lines.
Avoid tight bends and pinching. Use protective sleeves wherever a line contacts a metal edge or frame shield.
Install Inflation Valve or Compressor
Choose a Valve Location
Popular fill valve locations include the license plate recess, wheel well flange, under the gas cap door, or inside the fuel door. The license plate recess offers the easiest access for routine adjustments.
If you need to drill a hole, use a step bit for clean edges. Make sure the location is free of obstructions behind the panel.
Mount the Fill Valve
Slide a nut and star washer onto the valve stem, then push the valve through the hole. Add a rubber washer, flat washer, and nut on the back side, then tighten securely. Twist on the valve cap to keep debris out.
For dual independent valves, mount them under the bumper by drilling a hole through the bracket and securing with a bolt to prevent vibration from loosening them over time.
If you are adding an onboard compressor, mount the tank near the frame rail and wire a pressure switch and control valve for automatic inflation.
Final Hardware Tightening
Torque All Fasteners
Follow this final tightening sequence to avoid warping brackets or leaving loose connections:
- Upper bracket bolts: torque to 20 ft-lbs using a 7/32-inch Allen wrench
- Lower clamp bolts: tighten in a crisscross pattern
- Carriage bolts: use a 14 mm wrench and tighten alternately
- Jam nuts: secure with a 24 mm socket
On Silverado 3500HD models, the final top bolts must be hand-tightened because clearance is too tight for air tools. You can use an impact wrench on the passenger side where space allows.
Reinstall Removed Components
Reattach brake line brackets using the original hardware. Reconnect the ABS line and secure the wire loom. Replace any heat shields you moved and confirm the exhaust has adequate clearance.
Before lowering the truck, double-check that all tools and debris are clear of the work area.
Test for Leaks and Set Pressure

Perform a Soapy Water Leak Test
Inflate the system to 50 PSI (or follow the manufacturer specs, typically 25–65 PSI). Mix dish soap with water in a spray bottle and apply it to all T-fittings, swivel fittings, push-connect joints, and valve stems.
Watch for bubbles. Even small bubbles indicate a leak that will cost you pressure over time. If you find a leak, release the air, press the release tab on push-connect fittings, and pull the line out. Recut the end square, clean it, and reinsert firmly. For threaded leaks, tighten slightly and retest.
Repeat until no bubbles appear at any connection point.
Set Optimal Air Pressure

Adjust for Load Conditions
Match your air pressure to how you use the truck:
- Daily driving: 5–6 PSI for a smooth, nearly stock ride
- Light load: 15–25 PSI for slight firmness with no sag
- Travel trailer towing: around 70 PSI to restore level stance
- Fifth-wheel with 2,500+ lbs hitch weight: 40–50 PSI to lift 1.5+ inches
Air bags automatically level the vehicle under load, so start at low pressure and increase until your Silverado sits level. Use a measuring tape from the fender to the axle to confirm even stance on both sides.
Never run below 5 PSI, since this can damage the bladder over time.
Troubleshoot Common Issues
Fix Bouncy or Stiff Ride
Too much pressure while unloaded causes a harsh, bouncy feel. If you notice this, reduce pressure to 5–6 PSI for daily driving and only increase when you load the truck.
Resolve Bracket Misalignment
Slight overbending of the bracket arms can prevent bolts from threading fully. Use a pry bar to gently bend the arms inward until the bolts seat flush. This correction is common on 3500HD installs.
Stop Rattling Spacers
If the spacer rattles inside the bump stop cavity, it is likely too large. Replace it with a 1.75 to 2-inch spacer for a snug fit that eliminates vibration.
Prevent Hose Failure on Lifted Trucks
Factory hoses can crack under stress on trucks with 6-inch lifts. Upgrade to an aftermarket braided stainless hose kit for improved durability and pressure resistance.
Maintain Your Air Bag System
Inspect Monthly
Walk under your truck and check for rubbing or fraying on air lines, loose zip ties, missing protective sleeves, and corrosion on brackets or bolts. Re-tighten hardware if needed and reapply Loctite to bolts once a year.
Extend System Life
Install heat shields near exhaust components and use Teflon tape on every threaded connection. During winter storage, keep 5–10 PSI in the bags to prevent the rubber from cracking in extreme cold.
Know the Limits
Air bags do not increase your truck’s towing capacity or gross vehicle weight rating. They enhance stability and protect your suspension, but they must be used with proper hitches and weight distribution equipment for best results.
In a parallel-connected setup, both bags share pressure. If one leaks, the other compensates, which improves overall reliability and keeps you level until you can repair the leak.
Frequently Asked Questions About Installing Air Bags on Silverado
How long does it take to install air bags on a Silverado?
Most DIY installations take 2–4 hours with basic hand tools. Experienced installers can finish in under 2 hours, while first-timers may need a full afternoon.
Do air bags increase towing capacity on a Silverado?
No. Air helper springs improve stability and ride quality but do not change your truck’s rated towing capacity or GVWR.
Can I install air bags without drilling?
Many kits for AT4, Trail Boss, and standard 1500 models are bolt-on with no drilling required. Fifth-wheel hitch bracket applications typically require drilling two pilot holes.
What pressure should I run in my Silverado air bags?
Run 5–6 PSI for daily driving with no load. Increase to 40–70 PSI based on trailer weight and hitch type. Never run below 5 PSI.
Will air bags work with a lifted Silverado?
Yes, but you may need to upgrade to braided stainless steel hoses if you have a 6-inch lift. Factory hoses can fail under the increased pressure and articulation.
Do I need an onboard compressor for my air bags?
No. A simple fill valve lets you inflate manually with a portable compressor or gas station air. An onboard compressor adds convenience but is not required.
Key Takeaways for Installing Air Bags on Your Silverado
Installing air bags on your Silverado is a practical upgrade that pays off the first time you tow a heavy load. Focus on leak-free connections by cutting airline tubing square, using Teflon tape on threaded fittings, and testing every joint with soapy water. Set pressure based on load, starting at 5–6 PSI for daily driving and increasing only when needed.
Most DIYers with basic tools can complete this job in a single afternoon. Grab your kit, follow the torque specs for your model, and your Silverado will ride level, handle better, and last longer under heavy loads.



