
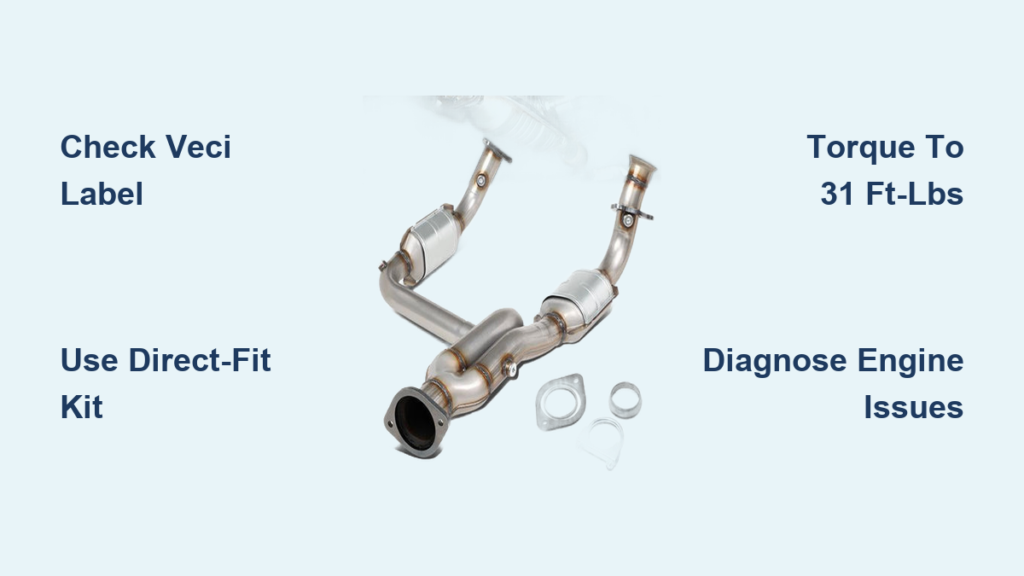
If your Chevy Silverado is throwing a P0420 or P0430 code along with a rotten egg smell and sluggish acceleration, the catalytic converter has likely failed. This emissions component breaks down over time due to age, engine problems, or rust damage, especially on older trucks. Replacing it yourself can save over $2,500 compared to dealership pricing, and most DIYers finish the job in 2 to 4 hours. In this guide, you will learn how to pick a compliant direct-fit converter, remove the old unit, transfer O2 sensors, and install the new assembly without welding.
Match Your Silverado’s Emissions Standard First
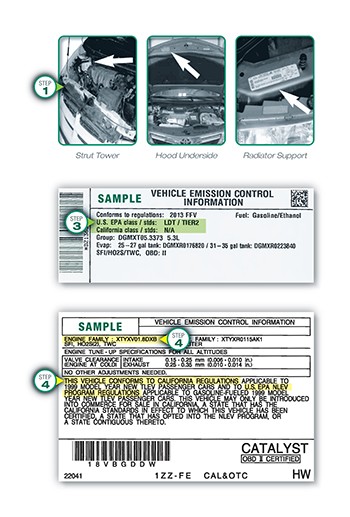
Check the VECI Label Under the Hood
Before buying any catalytic converter, locate the Vehicle Emissions Control Information (VECI) label in the engine compartment. This label tells you whether your truck was built to Federal EPA standards or stricter California Air Resources Board (CARB) standards. Installing the wrong type can trigger failed inspections and fines in California, Colorado, New York, and Maine.
- CARB-compliant converters are legal in all 50 states but must match your truck’s Engine Family Number and Executive Order number.
- Federal converters cost less but are banned in CARB states and must never be installed on a truck that originally had CARB equipment.
Pick the Right Generation Part
Silverado catalytic converter replacements vary by model year:
- 1999–2006 (GMT800): Uses a dual converter setup with a Y-pipe and benefits from complete kits that include both converters.
- 2007–2013 (GMT900): Often requires removing the transmission cross-member for full access.
- 2009–2013 Silverado 1500: Best served by a pre-assembled Y-pipe kit that bolts in without welding.
- 2014–2018 (K2XX): Direct-fit units are available for 4.3L and 5.3L engines.
Choose Direct-Fit Over Universal

Why Direct-Fit Saves Time and Headaches
Universal converters require cutting and welding, which most DIYers cannot do at home. Direct-fit units like MagnaFlow (SKUs 52642, 49194, or 93419) or AutoSaver88 Y-pipe kits match factory dimensions, O2 sensor positions, and mounting points exactly. You bolt them in and go.
Pick the Correct Grade for Your Engine
- OEM Grade: Highest precious metal content and best chance of keeping the check engine light off, even with minor engine inefficiencies.
- HM (High Metal) Grade: Nearly identical to OEM and ideal for most DIY replacements.
- Standard Grade: Use only if your engine runs perfectly, since it may not resolve codes caused by small engine issues.
Consider a Full Y-Pipe Kit for Older Trucks
For 2009–2013 Silverado 1500 models with 4.3L or 5.3L engines, replacing the entire Y-pipe assembly is faster and more reliable than swapping individual cats. These kits cost around $400, far less than OEM parts, and come with gaskets, hardware, and correct O2 sensor bungs.
Gather Tools and Prep the Truck
Build Your Tool List
You will need a full socket set plus specialty tools to handle rusted components:
- Sockets in 10mm, 13mm, 14mm, 15mm, 18mm, 21mm, and 22mm (7/8 inch) sizes
- O2 sensor socket (22mm or 7/8 inch) or spark plug socket
- Pole jack or transmission jack for cross-member removal
- Torque wrench set to 31 ft-lbs
- Hanger removal tool or large pry bar
- Clip remover or flathead screwdriver
- Reciprocating saw or angle grinder for frozen bolts
- Penetrating oil like PB Blaster
- Anti-seize compound for O2 sensor threads
- Jack stands, gloves, safety glasses, and wheel chocks
Prep the Night Before
Rust is the biggest enemy on this job. Soak all exhaust bolts, flange nuts, and hangers with PB Blaster at least 12 hours before you start. Park on a level surface, disconnect the battery, and label each O2 sensor connector with tape so you do not mix up upstream and downstream units.
Remove the Old Catalytic Converter
Disconnect the Cat-Back Exhaust and O2 Sensors
Start at the rear and work forward:
- Loosen the cat-back clamp (13mm) connecting to the Y-pipe or converter.
- Support the rear exhaust with a floor jack or pole jack before removing hangers.
- Pop hangers out of their rubber isolators using a pry bar and hanger tool. Spray WD-40 on the isolators to prevent tearing.
- Disconnect O2 sensor wiring. On the driver’s side, unclip the harness from the transmission. On the passenger side, pull the green locking tab and slide the white clip apart with a trim tool.
- Unscrew each O2 sensor with a 7/8 inch socket. If a sensor is seized, heat the base (not the wire) with a propane torch.
Unbolt the Front Flange and Flex Pipe
The front connection near the engine is usually the most rusted:
- Remove the front O2 sensor if still installed.
- Unbolt the flange nuts (typically 15mm). The passenger side usually has three nuts per flange.
- Cut frozen bolts with a reciprocating saw if they will not budge. This is common on 2007–2013 models.
- Inspect the flex pipe for cracks. Replace it if damaged.
Drop the Cross-Member for Full Access
On 2007–2013 models, you must remove the transmission cross-member:
- Support the transmission with a pole jack.
- Remove the mount bolts (15mm) and cross-member side bolts (21mm).
- Lower the cross-member slowly. Never let it drop.
- Slide the Y-pipe or converter assembly out once fully disconnected.
Transfer O2 Sensors and Prep the New Unit
Move Sensors Carefully
Unscrew each O2 sensor from the old converter using a 7/8 inch wrench. Do not swap upstream and downstream positions. Apply a small amount of anti-seize to the threads unless the sensors came pre-coated. Hand-thread them into the new converter to avoid cross-threading, then snug with a socket.
Seat New Gaskets the Right Way
Install the new doughnut gaskets on both flange ends. Apply a small dab of high-temp adhesive like E6000 to hold each gasket in place during alignment. This prevents the gasket from shifting while you mate the heavy pipes together.
Install the New Catalytic Converter
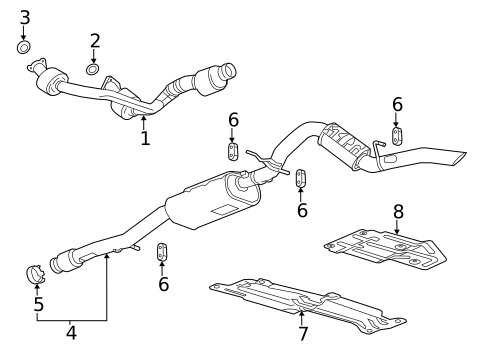
Position and Align the Assembly
- Start with the passenger side or the larger pipe section. New units often have thicker walls and need careful maneuvering.
- Mate the flanges slowly and keep the gaskets centered.
- Hand-start all nuts to avoid cross-threading. Reuse original GM heat-treated nuts if they are in good shape, since aftermarket nuts are often softer.
Reinstall the Cross-Member and Supports
- Raise the transmission slightly to realign the cross-member.
- Reinstall the side bolts (21mm) and transmission mount bolts (15mm).
- Tighten the cross-member securely before final torque.
Reconnect the Exhaust and O2 Sensors
- Reattach the cat-back exhaust and tighten the clamp (13mm or 15mm).
- Reconnect each O2 sensor harness and confirm the locking tabs click.
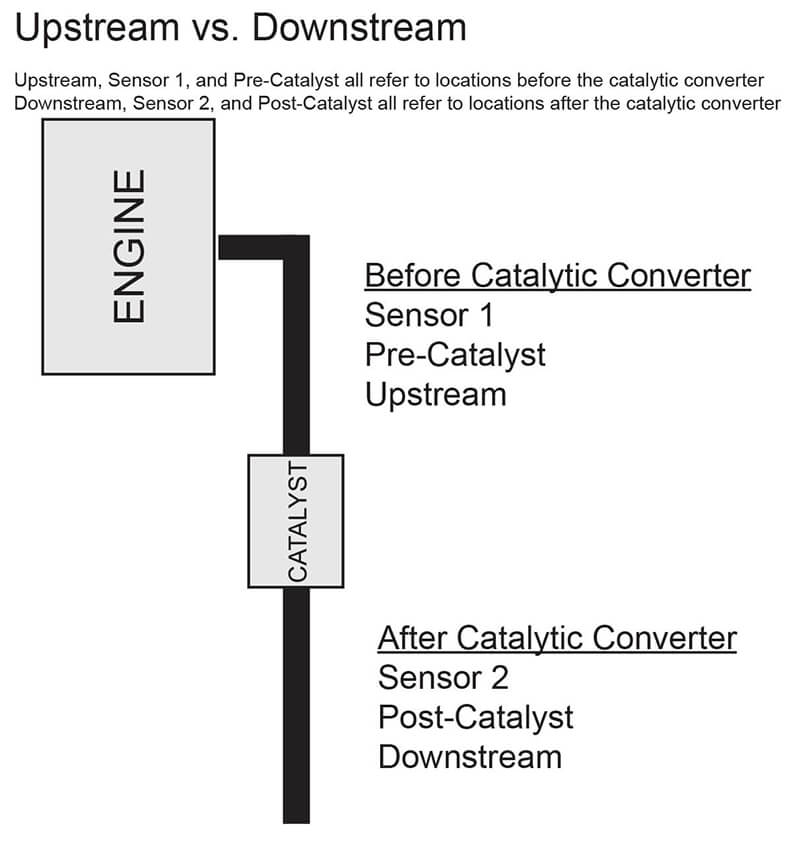
- Double-check your labels. Upstream sensors control fuel trim, while downstream sensors monitor catalyst efficiency.
Final Torque and Leak Test
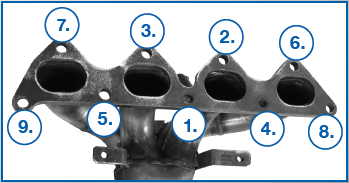
Torque to 31 Ft-Lbs
Tighten all flange nuts to 31 ft-lbs in a crisscross pattern using a torque wrench. This prevents warping and exhaust leaks. Avoid over-tightening, which can crack flanges or damage gaskets. Retighten after the first heat cycle once the system cools.
Start the Engine and Listen
- Start the truck and listen for hissing or popping sounds near the flanges.
- Inspect every joint visually for leaks.
- Confirm the check engine light stays off. If it returns, verify O2 sensor connections and placements.
- Clear any stored codes with a scanner if needed. Some systems require a drive cycle to fully reset.
Avoid Common Mistakes
Diagnose Before You Replace
A failed catalytic converter is often a symptom, not the root cause. Misfires, rich fuel conditions, or oil burning can destroy a new converter within weeks. Use live data to compare upstream and downstream O2 sensor waveforms. A healthy cat shows a stable downstream voltage, while a failed cat mirrors the upstream oscillation.
Do Not Use Low-Grade Hardware
Many kits ship with soft steel nuts that seize or snap. Reuse original GM hardware if it is undamaged, or buy high-grade heat-treated replacements. Cheap hardware is one of the top causes of post-install leaks.
Do Not Force Misaligned Pipes
If the new unit does not line up, stop and check fitment. You may have the wrong part for your model. Verify Y-pipe routing, especially on 2009–2013 1500 trucks. Never bend pipes to force alignment, since this can crack welds and create leaks.
Maintain Your New Converter
Protect the New Cat for 100,000+ Miles
A new catalytic converter can easily outlast your truck if you avoid common pitfalls:
- Fix engine problems immediately so unburned fuel does not overheat the ceramic substrate.
- Use quality fuel and avoid frequent short trips that prevent proper warm-up.
- Inspect the exhaust annually, especially in salt-heavy regions.
- Replace faulty O2 sensors quickly, since a bad sensor can drive a rich condition that damages the cat.
Know When to Call a Professional
Most DIYers can handle a direct-fit replacement, but consider professional help if:
- Bolts are completely frozen and cutting is unsafe.
- Welding is required for a universal converter or damaged manifold.
- You live in a CARB state and are unsure about compliance.
- The check engine light returns after installation and deeper diagnostics are needed.
Frequently Asked Questions About Chevy Silverado Catalytic Converter Replacement
How long does it take to replace a catalytic converter on a Chevy Silverado?
Most DIYers complete the job in 2 to 4 hours using a direct-fit kit. Experienced mechanics can finish in 1 to 2 hours. Older trucks with heavy rust may take longer due to frozen bolts.
Can I replace just one catalytic converter on my Silverado?
Yes, you can replace a single converter if only one bank has failed. However, on 2009–2013 1500 models, replacing the entire Y-pipe assembly is often faster and more reliable than swapping individual units.
What happens if I install a Federal converter on a CARB truck?
Installing a Federal converter on a CARB-equipped truck is illegal in California, Colorado, New York, and Maine. It can trigger inspection failures and fines under the Clean Air Act.
Will a new catalytic converter fix my check engine light?
A new OEM-grade converter will clear P0420 or P0430 codes if the cat was the root cause. If the light returns, check for engine issues like misfires, rich fuel conditions, or swapped O2 sensors.
Do I need to weld when replacing a catalytic converter?
No, if you choose a direct-fit unit or a complete Y-pipe kit. These bolt into factory mounting points and require no cutting or welding. Universal converters do require welding and are not recommended for most DIYers.
How much does it cost to replace a catalytic converter on a Silverado?
DIY parts cost between $400 and $1,000 depending on the unit. Professional replacement at a dealership typically runs $3,062 to $3,188 including OEM parts and labor.
Key Takeaways for Replacing Your Silverado’s Catalytic Converter
Replacing the catalytic converter on a Chevy Silverado is a manageable DIY project when you prepare properly. Start by confirming your emissions standard on the VECI label, then choose a direct-fit OEM-grade unit that matches your model year. Soak every bolt the night before, label your O2 sensors, and use a pole jack to support the transmission when dropping the cross-member. Torque all flange nuts to 31 ft-lbs and always diagnose engine issues before installing the new cat to protect your investment. Grab a direct-fit kit, block out a Saturday, and you will save thousands while restoring your Silverado’s performance and emissions compliance.



