
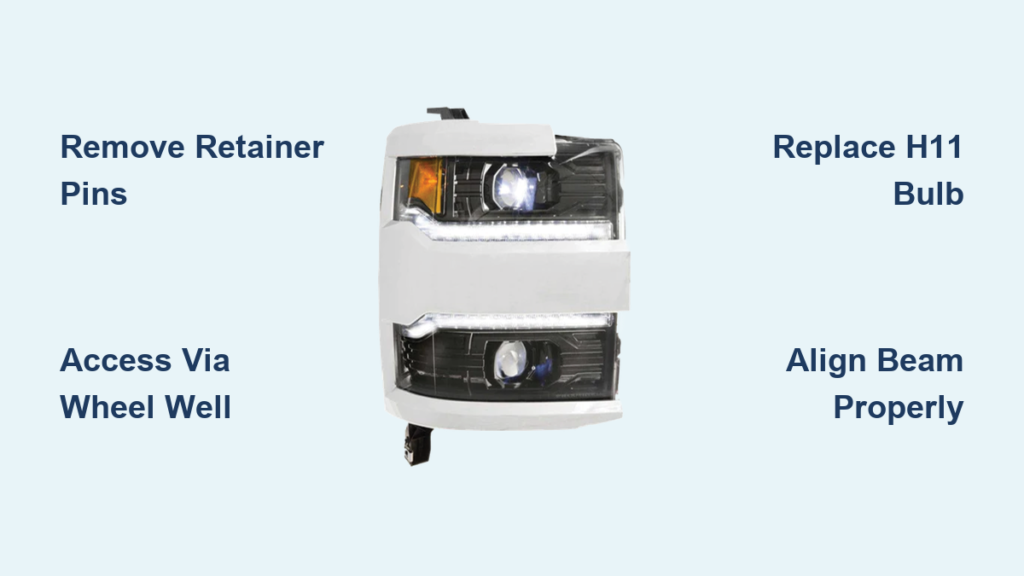
Replacing a headlight on a Chevy Silverado is a manageable DIY job for most truck owners. You don’t need a mechanic or specialty tools. Whether you’re dealing with a burned-out bulb or planning an LED upgrade, this guide walks you through every model year from 1999 to 2026.
The process varies slightly depending on your Silverado’s generation, but the core steps stay consistent: disconnect power, remove the old bulb or assembly, install the new unit correctly, and test everything. This guide breaks down each step by model year, includes pro tips to prevent common mistakes, and helps you choose the right bulbs and tools. Let’s get your Silverado back to full brightness.
Essential Safety Prep Steps
Before touching any components, take time to prepare your vehicle and workspace safely.
Stabilize and Power Down the Vehicle
Park on a level surface, engage the parking brake, and turn off the ignition. Switch off the headlights at the dash to prevent accidental activation. For added electrical safety, especially when handling wiring, disconnect the negative battery terminal. This eliminates the risk of short circuits during work.
Allow Cooling Time
If the headlights were recently used, wait 10 to 15 minutes for the housing and bulb to cool. Halogen and HID bulbs reach high temperatures that can cause burns on contact.
Protect Bulbs and Surfaces
Never touch the glass part of halogen or LED bulbs with bare hands. Skin oils create hot spots that lead to early bulb failure. Use clean gloves or a lint-free cloth when handling new bulbs. Lay a soft towel under the work area to protect lenses if removing assemblies.
Replace in Pairs
Install new bulbs on both sides, even if only one is out. This ensures even brightness and color temperature, improving nighttime visibility and safety.
1999–2007 Silverado: Bulb Access Without Grille Removal

This first generation allows direct bulb access without removing the grille or bumper in most cases.
Locate and Remove Retainer Pins
Open the hood using the interior release and secondary latch. Find two retainer pins securing the headlight housing near the fender and radiator support. Rotate each pin counterclockwise with your fingers or pliers to release. If stuck, gently insert a flat-blade screwdriver between the pin and housing to loosen without pulling.
Pro Tip: Keep track of pin positions. They may differ in length or design between left and right sides.
Access the Back of the Housing
Once pins are removed, slide the headlight assembly forward about an inch. This exposes the rear bulb sockets. No need to disconnect wiring yet.
Swap Low or High Beam Bulbs
Identify the failed bulb using these specs:
– Low Beam: H11
– High Beam: 9005
To remove:
1. Squeeze the tab on the wiring connector and pull straight off.
2. Twist the bulb socket counterclockwise (¼ to ½ turn) and pull out.
3. Remove the old bulb from the socket.
To install:
1. Insert the new bulb into the socket with the shorter pin facing toward the center of the truck.
2. Reinsert the socket and twist clockwise to lock.
3. Reconnect the wiring harness until it clicks. Gently tug to confirm.
Reinstall and Test
Slide the headlight back into position, reinsert retainer pins, and secure. Reconnect the battery if disconnected, then test both beams.
2007–2013 Models: Tight Access, Airbox Removal Needed

These GMT900 trucks have tighter engine bays, especially on the driver’s side.
Free Up Workspace by Removing Airbox
On the passenger side, remove the engine air cleaner cover:
1. Loosen the hose clamp on the intake tube with a flat-blade screwdriver.
2. Unplug the mass airflow (MAF) sensor.
3. Pull the housing and filter out.
On the driver side, access is tighter. You may need to fully remove the airbox or work around it depending on hand size.
Replace H11 or 9005 Bulbs
Bulb types:
– Low Beam: H11
– High Beam: 9005
Steps:
1. Turn the bulb housing counterclockwise to unlock.
2. Pull the housing out.
3. Lift the small retaining tab and slide the old bulb out.
For LED upgrades (e.g., Lasfit Pro-DC):
– Remove the factory dust cover first.
– Align LED tabs (varying lengths) with housing slots.
– Insert and rotate clockwise to lock.
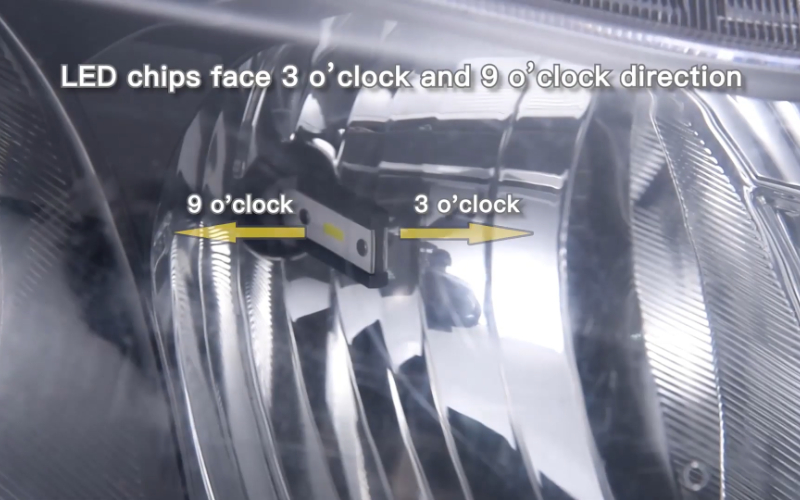
– Ensure LED chips are at 3 o’clock and 9 o’clock, power wire at 6 o’clock.
– Tuck wires into the new dust cover with vent hole facing down.
Reconnect and test before reassembling.
2014–2019 Silverado: Air Filter Box Must Be Removed
This generation requires more disassembly for bulb access, especially on the passenger side.
Remove Air Filter Housing
- Remove four Phillips screws from the airbox lid.
- Loosen the intake tube collar and unplug the MAF sensor.
- Slide the tube off and remove the entire airbox assembly.
Pull out the air filter to clear space behind the headlight.
Change the Bulb
- Pry off the dust cover tabs with a flat-blade screwdriver.
- Turn the cover left (counterclockwise) to remove.
- Unscrew the bulb and unplug the connector by lifting the tab.
- Insert the new bulb (H11 for low beam, 9005 for high beam) and screw it in.
- Reattach the cover and secure the tabs.
Reinstall Components
Reverse the steps: replace the air filter, reattach the airbox, reconnect the MAF sensor, and tighten the intake hose. Test lights before closing the hood.
2020–2026 HD Models: Wheel Well Access Trick
For 2020 and newer Silverado 2500/3500 trucks, you don’t need to remove the grille. Use the wheel well instead.
Turn Steering Wheel for Clearance
- Driver Side: Turn the wheel fully to the right.
- Passenger Side: Turn to the left.
This shifts the tire away from the fender liner, creating access to the headlight back.
Remove Fender Screws and Dust Cover
Use a screwdriver to remove 1 to 2 plastic screws holding the inner fender liner. Pull back the liner slightly. Locate the dust cover on the back of the headlight and pull it straight out using the tab.
Extract and Install H11 LED Bulbs
Factory bulbs are H11. For LED upgrades:
1. Press the clip on the connector and disconnect.
2. Rotate the old bulb counterclockwise and remove.
3. Snap the factory wire onto the LED bulb’s tab.
4. Align tabs and insert the bulb.
5. Press down and rotate clockwise to lock.
Critical: Verify LED chips are at 3 and 9 o’clock, power wire at 6 o’clock.
Tuck wires into the new dust cover, ensure vent faces down, and press firmly into place.
Full Headlight Assembly Replacement (All Generations)

If the lens is cracked or you’re upgrading to projector housings, full removal is required.
Remove Top Shroud and Grille
For 2014+ models:
1. Use a trim tool to pop out ten plastic rivets on the top shroud.
2. Lift the shroud straight up.
3. Remove eight 10mm bolts (four top, four bottom) securing the grille.
4. Pull the grille forward carefully, watching for hidden clips.
Unbolt the Headlight
With shroud and grille gone:
1. Access four 10mm bolts (one at each corner of the headlight).
2. Remove all bolts.
3. Pull the assembly forward slightly and disconnect the electrical harness by pressing the top tab.
Transfer Bulbs or Install New Unit
If using an aftermarket housing:
– Transfer bulbs and wiring from the old unit.
– Or connect pre-installed bulbs.
Before bolting in, test all functions (low, high, DRL).
Reassemble in Reverse Order
Reconnect wiring, insert assembly, secure bolts, then reinstall lower valence (if removed), grille, and top shroud.
Cost Note: OEM assemblies cost approximately $670 each. Aftermarket units are cheaper but vary in quality. Look for UV-resistant, anti-fog designs.
Diagnose Common Headlight Issues
Even after replacement, problems can occur. Here’s how to troubleshoot.
Bulb Burns Out Prematurely
Cause: Finger oils on the glass or poor dust cover seal.
Fix: Always wear gloves. Ensure dust cover is fully seated with vent down to prevent moisture and heat buildup.
Lights Flicker or Don’t Work
Cause: Loose connector or wrong bulb type.
Fix: Re-seat the harness until it clicks. Confirm bulb is H11 (low) or 9005 (high). If both sides fail, check the headlight switch or fuse.
Condensation Inside Housing
Cause: Damaged seal or low-quality aftermarket unit.
Fix: Replace with OEM or high-rated aftermarket housing. Some units include anti-fog vents. Ensure they stay unobstructed.
Align Beams After Installation

Misaligned headlights reduce visibility and blind other drivers.
Use the 6mm Allen Method
Found on 2007–2013 models:
1. Park 25 feet from a flat wall.
2. Mark the center of each headlight on the wall.
3. Adjust:
– Passenger side: Beam 2 inches below mark.
– Driver side: Beam 4 inches below mark.
4. Turn the Allen screw:
– Clockwise to lower.
– Counterclockwise to raise.
Test at night and fine-tune as needed.
Upgrade to LED: What You Need to Know
LEDs offer brighter, whiter light and longer life.
Choose the Right Kit
Look for:
– 55W, 5500 lumens per bulb.
– Built-in fans and heat sinks.
– Plug-and-play design with correct dust covers.
Avoid cheap LEDs. They often overheat or flicker.
Handle DRL Compatibility
On 2014+ models, Daytime Running Lights may not activate with aftermarket units.
Fix: Splice wires:
– Driver Side: Gray with purple stripe.
– Passenger Side: Solid purple.
Cut, connect to the DRL wire in the kit, and seal with heat shrink tubing.
Final Checks and Maintenance Tips
Before calling the job done, verify everything works.
Test All Functions
With the engine off but ignition on, check:
– Low beams
– High beams
– DRLs (if equipped)
– Turn signals (if housing was moved)
Prevent Future Issues
- Replace bulbs in pairs every 2 to 3 years.
- Inspect dust covers annually for cracks or looseness.
- Clean headlight lenses regularly to maintain brightness.
Pro Tip: Use a detailing spray or headlight restoration kit to remove yellowing and improve output.
Frequently Asked Questions About Changing a Chevy Silverado Headlight
What tools do I need to change a headlight on a Chevy Silverado?
For most generations, you need basic hand tools including a flat-blade screwdriver, Phillips screwdriver, pliers, and a 10mm socket with ratchet. Newer models (2014+) may also require a plastic trim removal tool and a 7mm socket. A 6mm Allen wrench is needed for beam alignment on 2007–2013 models.
Do I need to remove the grille to change a headlight bulb?
Not in most cases. On 1999–2007 models, you can access the bulbs by removing retainer pins and sliding the housing forward. On 2007–2013 models, removing the airbox provides enough workspace. On 2020+ HD models, the wheel well method eliminates grille removal entirely.
Why does my new headlight bulb burn out quickly?
Premature failure usually results from touching the glass with bare hands. Skin oils create hot spots that shorten bulb life. A poorly sealed dust cover can also allow moisture intrusion. Always handle bulbs with clean gloves and verify the dust cover is fully seated with the vent facing down.
Can I install LED headlights in my Silverado?
Yes. Most Silverado models accept H11 LED upgrades for low beams and 9005 for high beams. Look for kits rated around 55W and 5500 lumens with built-in cooling fans. On 2014+ models, you may need to splice the DRL wires (gray with purple stripe on driver side, solid purple on passenger side) for full functionality.
How much does it cost to replace a Silverado headlight assembly?
OEM headlight assemblies for 2014+ models cost approximately $670 per unit. Aftermarket assemblies are significantly cheaper but vary in quality. Bulb-only replacement is far more affordable, typically under $50 for standard halogen bulbs.
How do I align my Silverado headlights after installation?
Park 25 feet from a flat wall and mark the center of each headlight. On 2007–2013 models, use a 6mm Allen wrench to adjust the beam. Turn clockwise to lower and counterclockwise to raise. Aim the passenger side 2 inches below the mark and the driver side 4 inches below for optimal visibility without blinding oncoming traffic.
Key Takeaways for Changing Your Silverado Headlight
Changing a headlight on a Chevy Silverado is a straightforward task across all generations. The 1999–2007 models offer the easiest access with simple retainer pin removal, while 2007–2013 trucks require airbox removal for workspace. The 2014–2019 generation needs more disassembly but follows a clear pattern, and 2020+ HD models use a clever wheel well trick that avoids grille removal entirely.
Always wear gloves when handling new bulbs, replace both sides at the same time, and verify beam alignment after installation. For LED upgrades, confirm proper orientation (chips at 3 and 9 o’clock) and address DRL wiring on 2014+ models. With the right tools and these steps, you’ll have your Silverado shining bright in under an hour.
Next Step: Gather your tools, purchase the correct bulbs for your model year, and set aside a weekend morning to complete the job. Check your owner’s manual for any model-specific quirks before starting.



