
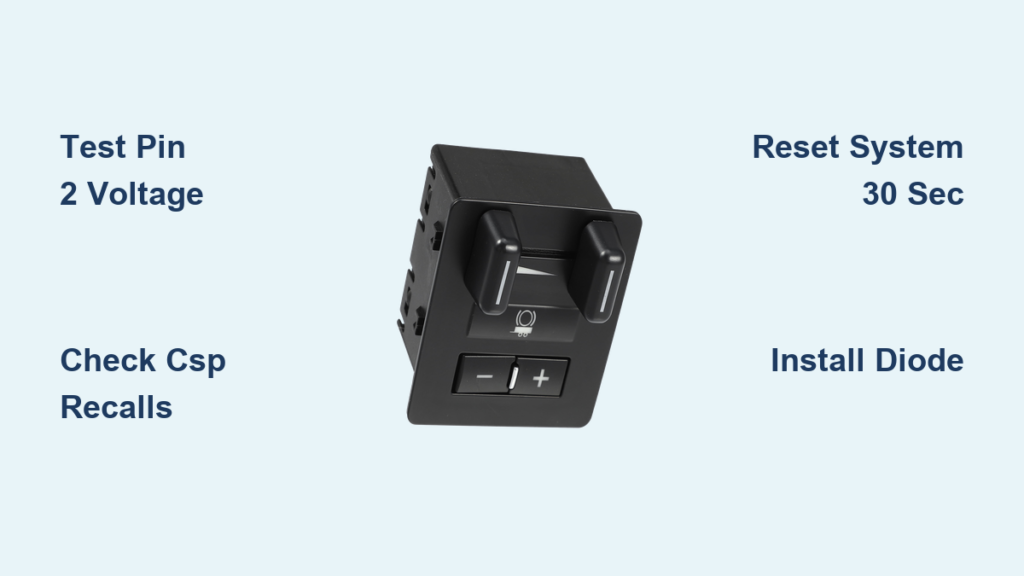
Your Silverado brake controller suddenly stops working right when you need it most. The “Trailer Brakes Disabled” warning flashes on your dash, the infotainment insists no trailer is connected, or your manual override does absolutely nothing. Thousands of 2019–2025 Silverado and Sierra owners face these exact failures, often miles from a dealer.
This guide breaks down the real causes behind a non-responsive factory Integrated Trailer Brake Controller (ITBC). You will learn how to test voltage output, decode warning messages, check recall eligibility, and decide between factory repairs or aftermarket replacements. Every step is built from verified service bulletins and owner reports.
Decode Warning Messages on Your Dashboard
“Trailer Brakes Disabled Service Required”
This red alert means the system has shut down on purpose. The Trailer Brake Power Control Module (TBPM) detected a fault and cut power to protect your truck and trailer from damage.
Common triggers include:
– Voltage backfeed from trailer batteries exceeding truck battery voltage
– A failed brake control switch
– Software conflicts after radio upgrades
– Internal TBPM module failure
Immediate action: Disconnect your trailer battery if it has onboard power (solar, generator, or house battery). Reconnect, restart the truck, and check if the message clears. If it does, install a one-way diode like the Roadmaster RM-690 to block reverse current permanently.
“No Trailer Connected” on Infotainment
Your radio screen claims no trailer is plugged in, even when one is. Yet your trailer lights and manual override still work. This mismatch points to a detection failure, not a complete system shutdown.
Why this happens:
– Trailer load too low for detection (LED lights draw less current than older bulbs)
– Missing K68 Trailer Lighting Control Module
– Radio upgraded without matching hardware (such as swapping from RPO IOS to IOU)
– Corroded or loose 7-pin connection
Pro tip: A standard test light will not trigger detection. Use GM’s Trailer Presence Simulator (EL-52641) or a real trailer to confirm the system recognizes a load.
Conflicting HUD vs. Radio Messages
You see “Trailer Brakes Connected” in the Driver Information Center but “No trailer connected” on the infotainment screen. This split-brain symptom usually means physical hardware does not match software expectations.
Root causes include:
– Vehicle lacks factory U1D Trailering App or K68 TLCM
– Radio upgrade added features not supported by existing wiring
– Communication error between the BCM and infotainment module
Reality check: GM cannot enable the Trailering App via software alone if the TLCM module is not installed. Verify your RPO codes before chasing updates that will not help.
Test Brake Output Voltage at the 7-Pin Connector
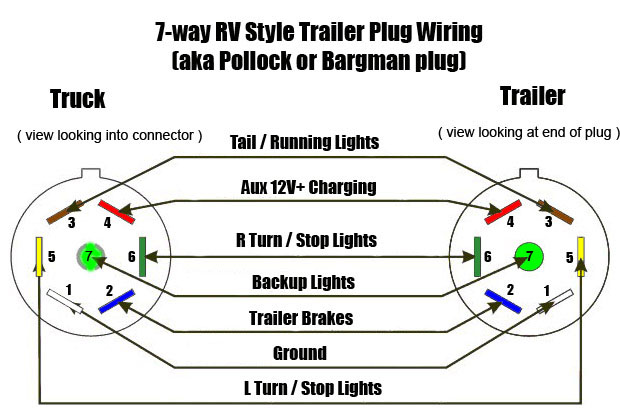
How to Measure Correctly
A working brake controller sends variable voltage to Pin 2 of the 7-pin connector. If readings stay stuck at 0.9V–1.2V or drop to 0V, the controller is faulty.
Tools needed:
– Digital multimeter
– Access to the 7-way connector
– Trailer Presence Simulator (EL-52641) or a known-good trailer
Steps:
1. Set your multimeter to DC voltage.
2. Connect the black probe to Pin 1 (Ground) and the red probe to Pin 2 (Brake Control).
3. Turn the ignition to ON.
4. Set trailer gain to 10.
5. Squeeze the manual override lever.
6. Read the voltage.
Expected result: Voltage should rise steadily, typically between 6V and 12V depending on gain and lever pressure.
Failure signs:
– Stuck at 0.9V–1.2V: Detection loop failure or module issue
– 0V output: Blown fuse, dead TBPM, or failed brake switch
– Fluctuating readings: Loose wiring or thermal failure
Critical note: If you get less than 1.2V, the controller is not functional, even if your trailer lights work perfectly.
Check for Recalls and Customer Satisfaction Programs

Verify Eligibility Now
GM has issued two Customer Satisfaction Programs covering thousands of trucks. These repairs are free, even if your truck is out of warranty.
CSP N232414840: Voltage Feedback Fix
- Models: 2020–2024 Silverado 2500HD/3500HD with RPO JL1
- Cause: Trailer battery voltage exceeding truck battery triggers shutdown
- Repair: Free brake switch replacement plus TBPM reprogramming
- Interim fix: Install Roadmaster diode #RM-690 on the trailer
CSP N242442100: 2022+ Refresh Models
- Models: 2022–2025 Silverado 1500/HD with factory brake controller
- Cause: Software bugs cause false “Service Required” messages
- Repair: Replace brake control switch and update software
Action: Visit my.chevrolet.com/recalls and enter your VIN. Any GM dealer can run the check in minutes.
Inspect Fuses and Wiring Connections
Locate Critical Fuses
A blown fuse can kill brake output while leaving lights fully functional. Check these three locations:
| Fuse | Location | Function |
|---|---|---|
| Fuse 82 | Interior fuse block | Trailer Interface Module |
| Fuse 84 | Interior fuse block | Trailer Brake Output |
| Fuse 25 | Underhood fuse box | Primary Trailer Brake (30A) |
Note: On 2019+ models, Fuse 25 powers four solid-state drivers in the TLCM. Overloading one circuit can shut down all outputs for the entire key cycle.
Pro tip: Do not just look. Test each fuse with a multimeter. Some fail internally without any visible damage.
Examine Connectors and Harnesses
Corrosion, bent pins, or loose plugs cause more failures than bad modules.
Inspect:
– 7-pin connector (clean with contact cleaner, apply dielectric grease)
– Chassis-side harness where it plugs into the trailer receptacle
– TLCM connector (usually near the rear bumper or frame rail)
Red flags:
– White or green crust on pins
– Moisture inside the connector housing
– Aftermarket adapters with built-in LEDs that trigger false detection
Perform a 30-Second System Reset
Reset Procedure That Actually Works
A simple reset clears false codes and restores function, especially after voltage spikes or disconnects.
Steps:
1. Turn the ignition OFF.
2. Unplug the trailer.
3. Wait 30 seconds (this lets modules fully reset).
4. Turn the ignition to ON without starting the engine. Wait 10 seconds.
5. Reconnect the trailer.
6. Start the engine and test the manual override.
When to use it:
– After installing a new trailer
– Following a jump-start or battery disconnect
– After long trips with intermittent failures
This often resolves phantom detection issues and reinitializes the TLCM without a trip to the dealer.
Diagnose Intermittent Brake Failures
Why Brakes Cut Out Mid-Trip
You tow fine for hours, then suddenly the brake controller disables. Restart the truck, and it works again. This cycle points to thermal or vibration-related faults.
Common causes:
– Overheating TLCM (solid-state drivers fail under sustained load)
– Loose wiring harness (vibration breaks the connection)
– Trailer battery voltage drift exceeding truck voltage
How to test:
– Monitor voltage at the 7-pin during long hauls
– Wiggle the harness near connectors while testing output
– Temporarily disconnect the trailer battery to rule out backfeed
Fix: Ensure the TLCM has airflow. Route wiring away from heat sources. Install a DC-to-DC charger or battery isolator on the trailer to stabilize voltage.
Rule Out Trailer-Side Issues
Test With a Known-Good Trailer
Before assuming your Silverado is broken, test with a trailer you know works. Alternatively, tow your suspect trailer with a different truck.
Trailer faults that mimic controller failure:
– Ground wire disconnected or corroded
– Brake magnets seized or worn out
– Trailer battery backfeeding the system
– Incorrect 7-pin wiring (rental trailers are often miswired)
Quick test: Use a 12V power source to directly power trailer brakes. If they do not engage, the problem is on the trailer side.
Disconnect the trailer battery during testing. If the “Service Required” message disappears, backfeed is the culprit.
Replace or Bypass the Factory Controller

Install an Aftermarket Unit
If your factory controller is out of warranty or keeps failing, many owners switch to a proven aftermarket unit for better reliability.
Why go aftermarket:
– No dealer programming required
– Plug-and-play or simple dash-mounted install
– Lower cost than OEM module replacement
– Better reliability and user control
Top choices:
– Tekonsha Prodigy P3: Proportional, self-calibrating, durable
– CURT Echo: Wireless, Bluetooth-controlled, easy setup
– Reese Brakeman IV: Budget-friendly, fits older harnesses
Installation basics:
– Tap into the brake pedal switch under the dash
– Connect to 12V constant power and ground
– Mount on the dash or under the dash
– Plug into the 7-pin connector (no cutting needed for most setups)
Cost comparison:
– OEM TBPM replacement: $400–$800 plus programming
– Aftermarket controller: $100–$200 plus minimal labor
Prevent Future Brake Controller Failures

Install a One-Way Diode
Voltage backfeed from trailer batteries is the leading cause of “Trailer Brakes Disabled” messages.
Solution: Install a one-way diode on the trailer’s charging line.
Recommended options:
– Roadmaster Single Park Light Diode #RM-690
– Battery isolator or DC-to-DC charger
This blocks reverse current while allowing the truck to charge the trailer battery normally.
Maintain Clean Connections
Prevent corrosion with routine care:
– Clean the 7-pin connector every 3 months
– Apply dielectric grease after cleaning
– Avoid leaving adapters plugged in when not towing
Myth: “Flashing trailer lights when parked is a defect.”
Truth: It is the TLCM checking for connection. This is completely normal.
Configure Trailer Profile Correctly
In the Trailering App, match settings to your actual trailer:
– No reverse lights? Turn off reverse brake sync
– No electric brakes? Do not enable brake profile
– Wrong setup triggers DTC B3890 and disables the app
Frequently Asked Questions About Silverado Brake Controllers
Why does my Silverado say “Trailer Brakes Disabled Service Required”?
This warning means the TBPM detected a fault and shut down the system to prevent damage. Common causes include voltage backfeed from trailer batteries, a failed brake control switch, or software glitches. Disconnect the trailer battery, restart the truck, and check for CSP eligibility.
How do I test if my Silverado brake controller is working?
Set your multimeter to DC voltage. Connect the black probe to Pin 1 (Ground) and the red probe to Pin 2 (Brake Control) on the 7-pin connector. With the ignition ON and gain set to 10, squeeze the manual override lever. A working controller should show voltage rising between 6V and 12V.
What fuse controls trailer brakes on a 2019 Silverado?
Check Fuse 84 in the interior fuse block for trailer brake output and Fuse 25 in the underhood fuse box for the primary 30A trailer brake circuit. Also verify Fuse 82 for the trailer interface module. Test each fuse with a multimeter, as some fail without visible damage.
Can I install an aftermarket brake controller on a Silverado with a factory one?
Yes. Many owners bypass the factory ITBC with aftermarket units like the Tekonsha Prodigy P3 or CURT Echo. You tap into the brake pedal switch signal, connect to 12V power and ground, and plug into the 7-pin connector. No dealer programming is required.
Why does my infotainment say “No Trailer Connected” when one is plugged in?
The TLCM detects trailers by sensing load on lighting circuits. Low-draw LED trailers may not meet the detection threshold. A standard test light also fails to trigger detection. Use GM’s Trailer Presence Simulator (EL-52641) or a real trailer with sufficient load to verify the system.
Is there a recall on Silverado brake controllers?
GM issued two Customer Satisfaction Programs: CSP N232414840 covers 2020–2024 HD models with RPO JL1 for voltage feedback issues, and CSP N242442100 covers 2022+ refresh models for software-related faults. Both include free repairs. Check your VIN at my.chevrolet.com/recalls.
Key Takeaways for Fixing Your Silverado Brake Controller
Start with the 30-second reset to clear false codes. Check for CSP eligibility before paying for any repairs. Test voltage at Pin 2 of the 7-pin connector. If you get less than 1.2V and fuses are good, you likely need a brake switch replacement or module repair.
For recurring issues or out-of-warranty trucks, consider installing a Tekonsha or CURT aftermarket controller. It is often cheaper and more reliable than chasing factory software bugs.
Do not tow with disabled brakes. Diagnose fast, fix right, and stay safe on the road.



