
A faulty gas gauge on your Chevy Silverado can leave you stranded with a surprise empty tank. For 1999 to 2005 models, especially the 1500 series with 4.8L engines, inaccurate or non-functional fuel gauges are a well-known issue. The problem usually traces back to one of three sources: the fuel sending unit in the tank, the instrument cluster, or the wiring and ground connections. The good news is that targeted diagnosis can pinpoint the exact cause without wasting money on unnecessary parts.
This guide walks you through proven methods to diagnose and repair your Silverado’s gas gauge. You will learn how to read your symptoms, use an OBD2 scan tool to isolate the fault, and apply the right fix, whether that means a simple fuel additive, a wiring repair, or a full sending unit replacement.
Decode Your Gauge Symptoms
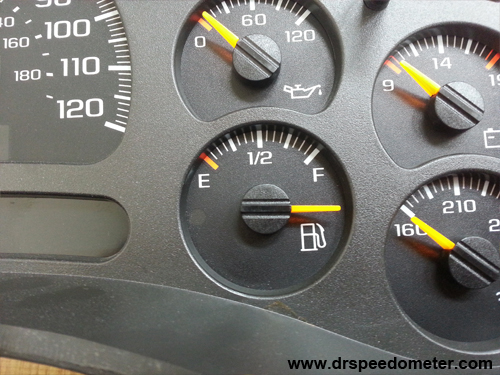
The first step in fixing your gas gauge is understanding what the needle is telling you. The gauge’s behavior, combined with whether the low fuel light activates, points directly to the root cause.
Gauge Drops to Empty and Low Fuel Light Turns On
If your needle hits “Empty” and the low fuel warning light illuminates at the same time, the problem is almost always a bad ground connection. The fuel sending unit relies on a solid ground to complete its circuit. When that ground breaks due to corrosion, a loose strap, or damaged wiring, the signal defaults to zero. This makes the gauge read empty and triggers the warning light.
What to check:
– Ground wire from the fuel tank to the frame
– Corrosion on the sender unit’s mounting points
– Continuity between the sender housing and chassis ground
Gauge Drops to Empty but No Warning Light
This is a critical clue. The gauge reads empty, but the low fuel light stays off. This means the ground circuit is intact, but the signal from the sender is lost. The issue is likely either a failed fuel sending unit or a faulty instrument cluster.
If the cluster was recently repaired, this symptom often points to poor soldering on the fuel gauge circuit. If untouched, the sending unit’s internal rheostat or float is the likely culprit.
Needle Stuck Slightly Past Empty
A common complaint is a gauge that never moves, stuck just past “E” even with a full tank. This indicates no signal variation is reaching the cluster. Possible causes include:
- Sending unit disconnected or unplugged
- Float arm mechanically stuck or broken
- Failed stepper motor in the instrument cluster
- Open circuit in the signal wire
Gauge Bounces or Spikes Erratically
When you turn the key to “On,” the gauge jumps around for a few seconds before settling. Some minor movement is normal, but prolonged bouncing, sudden spikes to “Full,” or fluctuating readings while driving point to:
- Dirty rheostat wiper in the sending unit
- Failing stepper motor in the cluster
- Intermittent wiring connection
This erratic behavior often improves with fuel system cleaning.
Test the Sending Unit Signal with an OBD2 Scanner

Before tearing into the tank or cluster, verify where the fault lies. The most reliable method uses an OBD2 scan tool.
Use Live Data from the PCM
- Plug in a scan tool that reads live data from the Powertrain Control Module (PCM).
- Turn the key to “On” without starting the engine.
- Navigate to Fuel Level Sensor or Fuel Tank Level in the data stream.
Compare two readings: what the scanner shows (for example, “75%”) and what the gauge displays (for example, “Empty”).
If Scanner Matches Actual Fuel Level
If the scanner reads correctly but the gauge is wrong, the instrument cluster is the problem. The PCM receives a good signal, but the cluster fails to display it.
If Scanner Shows 0% or Erratic Values
If the scanner reading matches the gauge’s wrong behavior, the fault lies in the sending unit or wiring between the tank and PCM.
If No Data or Default Value Appears
This suggests a disconnected sender, broken wire, or failed sensor.
This single test can save you hours of unnecessary work.
Inspect Wiring and Ground Connections
Electrical issues are common and easy to overlook. A few minutes of inspection can prevent a full tank drop.
Check the Tank Ground Strap
The fuel sender needs a solid ground path to the frame. Locate the ground strap or wire connecting the fuel tank to the chassis.
Steps:
1. Visually inspect for corrosion, rust, or breaks.
2. Use a multimeter to test continuity between the sender housing and a known good ground on the frame.
3. Clean contact points with a wire brush if corroded.
4. Reattach securely.
A loose or corroded ground is a frequent cause of the “Empty + Light On” symptom.
Examine the Wiring Harness
Trace the harness from the fuel tank to the body connector. Look for:
- Pinched or chafed wires
- Corrosion in connectors
- Moisture inside plugs
Pay special attention to areas near the rear axle or frame where vibration and road debris cause damage. Use a multimeter to test for open circuits or shorts to ground in the sender signal wire.
Try Fuel Additive Cleaning First
Before replacing parts, try a non-invasive fix using GM’s fuel system cleaner designed for sending unit contacts.
This works because the sending unit uses a conductive wiper that slides over a resistive track. Over time, varnish, ethanol residue, or oxidation builds up, causing poor contact and erratic readings.
Apply the GM Fuel Additive
- Add half a bottle to a full tank of gas.
- Drive until the tank is nearly empty.
- Add the remaining half to the next full tank.
- Drive normally.
Success stories: Users with jittery gauges or random spikes to “Full” have restored full function after this treatment, with no disassembly required.
Note: This won’t fix a mechanically stuck float or broken wiper, but it is a low-cost first step for intermittent issues.
Replace the Fuel Sending Unit
If cleaning doesn’t work and diagnostics point to the tank, it is time to replace the sender.
The Sending Unit Is Part of the Fuel Pump Module
On these Silverados, the fuel level sender is integrated into the fuel pump module. You cannot typically buy just the sender; it is replaced as a complete unit.
Common part numbers:
– AC Delco 251-1045
– Dorman 916-104
Tools needed:
– Jack and stands
– Socket set
– Fuel line disconnect tool
– Torx T-30 or T-50 (depending on model)
– New fuel pump module gasket
Steps to Replace
- Relieve fuel pressure by removing the fuel pump fuse and starting the engine until it stalls.
- Drain or lower the fuel tank. Some models have a bed access panel, but most require tank removal.
- Disconnect the fuel lines and electrical connector.
- Unbolt the fuel pump module (usually 6 to 8 Torx bolts).
- Lift out the module, being careful not to damage the sender arm.
- Install the complete new unit or transfer the fuel pump and sender if reusing.
- Reinstall, torque bolts evenly, and reconnect everything.
- Refill and test.
Time estimate: 2 to 4 hours, depending on access.
Pro tip: If you are dropping the tank, consider replacing the fuel pump at the same time if it is over 10 years old.
Diagnose the Instrument Cluster

If the OBD2 scanner shows correct fuel levels but the gauge is dead or erratic, the problem is in the dash.
Perform a Cluster Swap Test
The fastest way to confirm cluster failure is to borrow a known good cluster from a donor Silverado of the same year and model.
- Remove your cluster (usually 2 to 4 screws behind the bezel).
- Install the test cluster.
- Turn the key to “On.”
If the gauge works, your original cluster is faulty.
Check Stepper Motor and Solder Joints
The fuel gauge is driven by a stepper motor, a small electric motor that moves the needle. These fail over time, especially in 2003 to 2005 models.
Signs of stepper motor failure:
– Gauge doesn’t move at all
– Needle sticks or jumps in large increments
– Works intermittently
You can replace the stepper motor individually, but it requires soldering skills, a heat gun or rework station, and a replacement motor (part # 22678625 or equivalent).
Warning: Poor soldering can damage the circuit board. If you are not experienced, send the cluster to a professional repair service.
Look for Damaged Circuit Board Traces
If the cluster was repaired before and the fuel gauge still fails, inspect the back of the circuit board for cracked solder joints, lifted pads, or burnt traces. These often occur during DIY repairs when excess heat damages the board.
Use a magnifying glass and multimeter to check continuity across the fuel gauge circuit.
Prevent Future Gauge Problems
Once fixed, keep the system working with these tips.
Use Quality Fuel and Additives
Ethanol-blended gasoline can leave deposits on the sender’s wiper. Use top-tier gas and add a fuel system cleaner every 15,000 miles to prevent buildup.
Inspect Grounds During Maintenance
When doing exhaust, suspension, or brake work near the rear, quickly check the tank ground strap for corrosion or damage.
Verify Repairs Immediately
After any cluster or sender work:
- Fill the tank completely.
- Watch the gauge rise to “Full.”
- Drive until low fuel and confirm the warning light activates.
This ensures both signal and logic circuits are functional.
When to Replace the Entire Cluster
If multiple gauges are failing, the backlighting is out, or the circuit board is damaged beyond repair, replace the entire instrument cluster.
Options:
– New OEM cluster: Most reliable, but expensive ($300 to $600)
– Rebuilt cluster: Professionally repaired, tested, and calibrated
– Used cluster: Cheaper, but may have hidden issues
Note: Some clusters require VIN programming or mileage syncing. Check compatibility before installing.
Frequently Asked Questions About Fixing a Chevy Silverado Gas Gauge
Why does my Silverado gas gauge drop to empty but the low fuel light stays off?
This symptom means the ground circuit is intact, but the signal from the sending unit is lost. The most likely causes are a failed fuel sending unit inside the tank or a poor solder joint on the instrument cluster’s fuel gauge circuit.
Can a fuel additive really fix a gas gauge?
Yes, in some cases. GM manufactures a fuel system cleaner designed to remove deposits from the conductive wiper inside the sending unit. Users with jittery gauges or occasional spikes to “Full” have restored proper function by adding half a bottle per tank for two consecutive tanks.
How do I know if my instrument cluster is the problem?
Use an OBD2 scan tool to read the PCM’s live fuel level data. If the scanner shows the correct fuel percentage but the gauge reads wrong, the cluster is faulty. You can also confirm by swapping in a known good cluster from a compatible Silverado.
Is the fuel sending unit sold separately from the fuel pump?
On 1999 to 2005 Silverados, the sending unit is integrated into the fuel pump module. It is typically replaced as a complete assembly rather than as a separate part.
How long does it take to replace the fuel sending unit?
Expect 2 to 4 hours, depending on whether your model has a bed access panel or requires full tank removal.
Key Takeaways for Fixing Your Silverado Gas Gauge
Fixing a gas gauge on a 1999 to 2005 Chevy Silverado comes down to accurate diagnosis. Start by observing your symptoms: the combination of gauge position and low fuel light behavior narrows the fault to the ground, sender, or cluster. Use an OBD2 scanner to compare PCM data against the gauge reading and isolate the problem in minutes. Try the fuel additive treatment first for erratic readings, as it costs little and often works. If the sender is confirmed bad, plan for a fuel pump module replacement. For cluster issues, verify with a swap test before investing in repairs. With the right diagnostic approach, you can solve this common Silverado problem without unnecessary part swaps and get back to driving with confidence.



