
A drooping headliner in your Chevrolet Silverado is more than an eyesore. It signals deeper deterioration caused by heat and sun exposure breaking down the foam backing over time. Once that foam turns to dust, the fabric separates from the board and starts sagging, especially above the door frames where movement and temperature swings weaken the bond. Whether you drive a classic 1988 model or a 2006+ crew cab, this issue hurts aesthetics, resale value, and even safety if the liner drops while driving.
You do not need to replace the entire headliner unless damage is severe. This guide covers proven silverado headliner fix options, from low-cost clips and screws to full DIY re-upholstering and professional services. You will learn how to match the right repair to your truck, budget, and skill level.
Identify the Damage Type
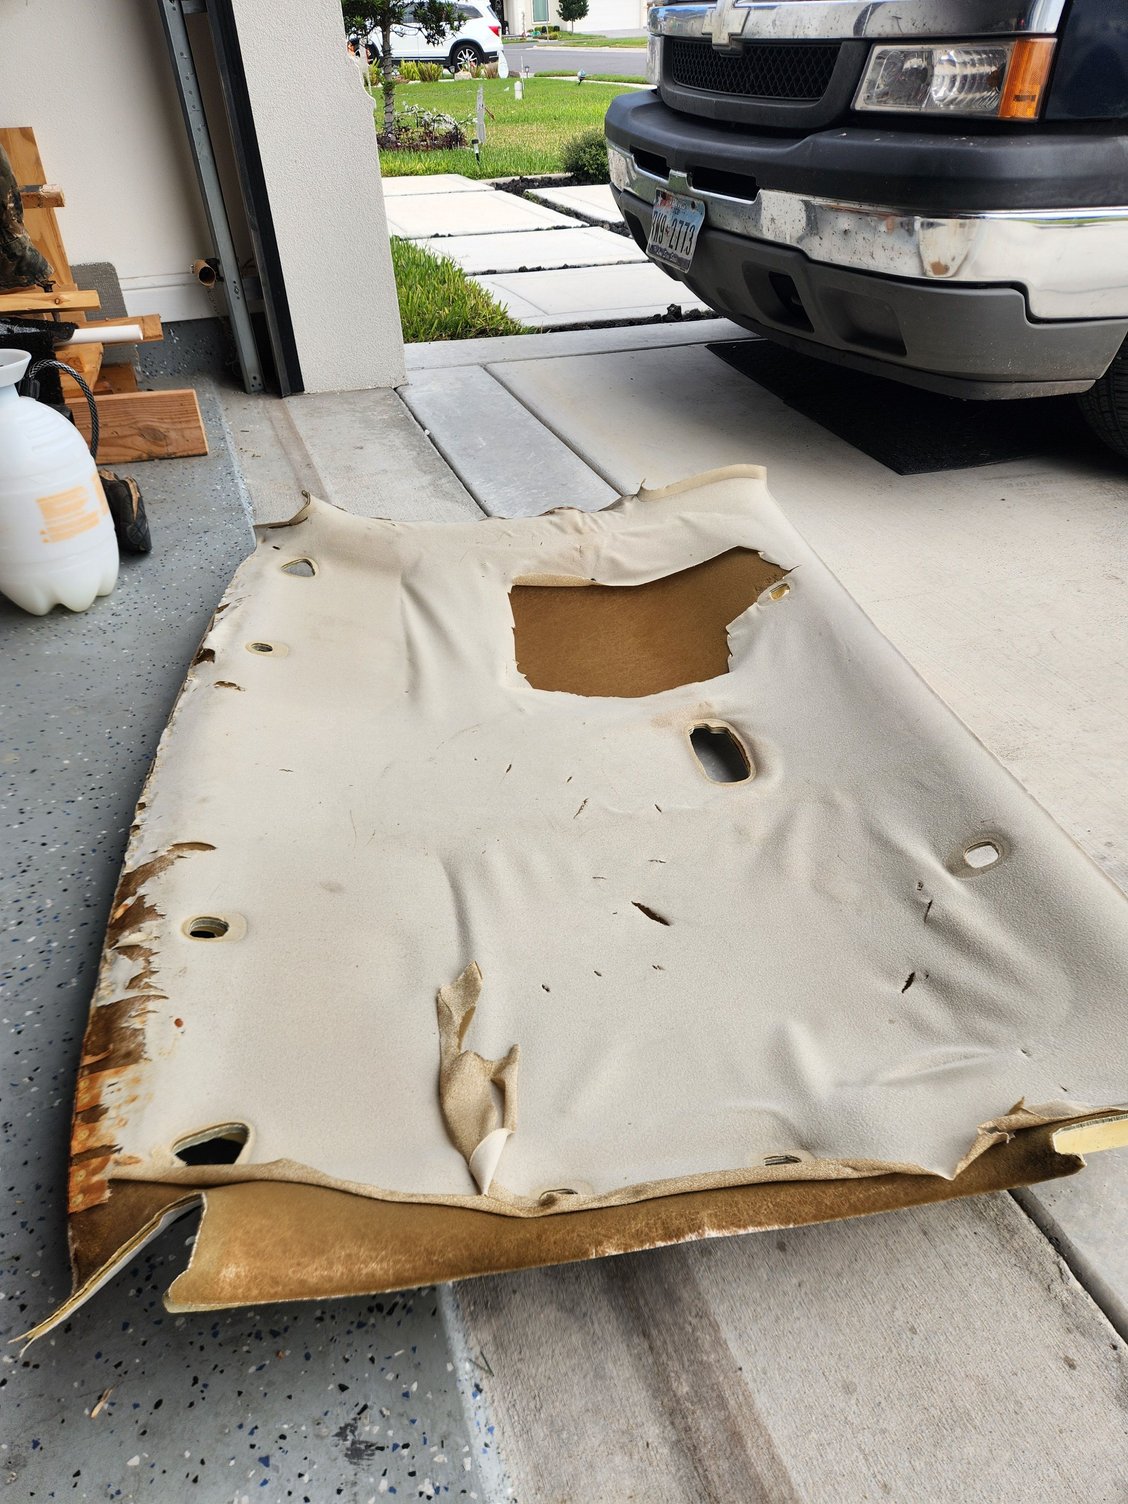
Before choosing a repair method, inspect where and how your headliner is failing. Not every fix works for every type of damage.
Check for Foam Rot
Remove the visor bolts and gently pull down the front edge of the headliner. If the foam layer crumbles like dust when touched, it is fully degraded. Re-gluing will not hold. You need new fabric with fresh foam backing.
Locate Sagging Zones
Most Silverados sag near the A-pillar above the front doors or along the side edges. These areas flex with door movement and trap heat. If only the perimeter is loose, edge repair clips may be enough.
Test Adhesion Strength
Press on the center of the headliner. If it springs back firmly, the core structure is intact. If it gives way or feels hollow, internal separation has occurred, meaning you need full reattachment or replacement.
Choose Your Repair Strategy
Your fix depends on damage extent, budget, and desired finish. Options range from $10 quick patches to $200 professional jobs.
Use Edge Repair Clips (Low Effort)
For localized sagging above the doors, rubberized plastic clips offer a factory-like fix without removing the headliner.
- Part #1007, priced at $13.95 plus $6.95 shipping
- Snaps into place along left and right edges
- Holds fabric taut against the roof rail
- Works on 2006 Silverado 1500, Avalanche, Sierra, and more
- Installs in under 10 minutes with no tools
These U.S.-made clips are rated 4.9/5 for accuracy and durability. Over 1,200 have sold with strong user feedback, making them ideal for temporary or permanent edge stabilization.
Install Screws or Pins (Budget Fix)
When cost matters more than looks, mechanical fasteners keep fabric off your shoulders.
- Headliner screws push through fabric into the board
- Tack pins work similarly but leave smaller holes
- Available at auto parts stores for under $10
Warning: These create visible dots across the ceiling. Many users call the look “tacky,” but they hold well in dry climates. Avoid them in humid areas where moisture accelerates foam breakdown.
Re-Glue With Proper Adhesive
For widespread but shallow separation, re-bonding the fabric works if done correctly.
Clean the Board First
Use a wire brush to scrape off all rotted foam until the cardboard surface is bare and rough. Any residue prevents adhesion.
Apply Specialized Spray Glue
Do not use 3M carpet trim adhesive. It bleeds through fabric and fails within days. Instead, use dedicated spray can headliner adhesive (Item #6731, $18.95).
- Spray both the board and back of the fabric
- Wait 2 to 5 minutes for the glue to become tacky
- Stretch fabric smoothly over the board
- Use a damp hot rag to press out wrinkles and seal edges
- Trim excess with a utility knife
This method restores a clean look and costs under $60 with a DIY kit (Item #6729).
Replace Fabric and Board (Complete Restore)
For trucks with total foam disintegration or stained fabric, full replacement delivers lasting results.
Buy a Pre-Made Headliner Board
Stock Interiors offers model-specific boards:
– 1999–2006 2-door (suicide doors): $565.95 (Item #23961)
– 1999–2006 3-door: $929.95 (Item #24095)
– 1988–1998 2-door: $445.95 (Item #6823)
Boards include correct contours for overhead consoles and rear-hinged doors.
Or Build Your Own
Buy components separately:
– Fabric: $20.95/yd (Item #6730), choose color match
– Bows and brackets: $194.95 to $239.95 (Items #7890, #7529)
– Universal DIY Kit: $39.90 (Item #6729)
This route suits restorers wanting custom colors or repairing vintage models.
Hire a Mobile Professional

If you lack time or confidence, mobile headliner specialists provide factory-quality results.
What the Service Includes
- Full removal of old fabric
- Cleaning and inspecting the board
- Installing new foam-backed material
- Reinstalling with factory tension
One verified job cost $195 and took under 3 hours. Customers report “wonderful” results indistinguishable from OEM.
Why Go Pro?
- No mess in your garage
- Expert use of heat tools and adhesives
- Warranty-backed work common with local vendors
- Saves hours of DIY trial and error
Search local Facebook groups or auto upholstery shops for mobile services in your area.
Avoid Common Mistakes
Even simple fixes fail when basic rules are ignored.
Never Use Carpet Adhesive
Standard 3M trim glue softens in heat and seeps through fabric. Users report bleed-through and bond failure within 48 hours. Always use headliner-specific spray adhesive.
Don’t Skip Surface Prep
Glue will not stick to dusty, foamy residue. Wire brushing the board clean is non-negotiable for long-term success.
Ignore “Set and Forget” Timing
Spray adhesive needs 2 to 5 minutes to cure before contact. Apply too soon, and it smears. Wait too long, and it loses tack. Follow the can instructions exactly.
Compare Cost vs. Outcome

| Fix Type | Cost | Labor | Aesthetic | Durability |
|---|---|---|---|---|
| Edge Clips | $14 | 10 min | Good (edges only) | High |
| Screws/Pins | <$10 | 15 min | Poor | Moderate |
| Re-Glue (Correctly) | $60 | 2–3 hrs | Excellent | High |
| Full DIY Kit | $100 | 4–6 hrs | Excellent | High |
| Pro Mobile Service | $195 | None | Excellent | High |
| OEM Board | $425–$930 | High | Perfect | Perfect |
For most owners, edge clips or proper re-gluing offer the best balance of cost and quality.
Maintain Your Fix Long-Term
Prevent future sagging with these steps:
Reduce Interior Heat
Park in shade or use a sunshade. Interior temps over 140°F accelerate foam decay. Even a 20°F drop extends headliner life.
Ventilate the Cabin
On hot days, crack windows slightly or use a solar fan. Lower humidity slows adhesive breakdown.
Inspect Annually
Check the front and side edges each summer. Catching small lifts early allows for easy clip or glue repair before full detachment occurs.
Frequently Asked Questions About Silverado Headliner Fix
What causes a Silverado headliner to sag?
Heat and sun exposure break down the foam backing on the headliner fabric. Over time, the foam disintegrates into dust, causing the fabric to separate from the board and sag, especially above the door frames.
Can I fix a sagging headliner without removing it?
Yes. Edge repair clips (Part #1007) snap into place along the left and right edges without removing the headliner. They work well for localized sagging above doors and install in under 10 minutes.
What adhesive should I use for a Silverado headliner fix?
Use a dedicated spray can headliner adhesive such as Item #6731 ($18.95). Avoid standard 3M carpet trim adhesive because it bleeds through fabric and fails under heat within days.
How much does professional headliner repair cost?
Mobile headliner specialists typically charge around $195 for a complete Silverado headliner replacement. The job includes removal of old fabric, board cleaning, and installation of new foam-backed material, usually in under 3 hours.
Are headliner screws a good permanent fix?
Headliner screws and tack pins hold fabric in place but leave visible dots across the ceiling. Many users find the look unappealing. They work in dry climates but are not recommended for humid areas where moisture speeds foam breakdown.
How long does a DIY headliner repair last?
A properly done DIY re-glue with surface prep and specialized adhesive can last for years. Skipping steps like wire brushing the board or using the wrong adhesive causes failure within days.
Key Takeaways for Your Silverado Headliner Fix
A sagging Silverado headliner is fixable at any budget. For edge sag, Part #1007 clips deliver fast, clean results in minutes. For full restoration, proper spray adhesive and surface prep make the difference between a lasting fix and a repeat job. If you want it done right without lifting a tool, $195 mobile services offer excellent value. Choose the method that fits your truck’s condition and your comfort level, because no one should drive with a ceiling that droops.



