
Nothing ruins a drive faster than blasting your Silverado’s AC on a 95-degree day and getting warm air instead. Maybe the temperature keeps shifting on its own, or the driver’s side feels tropical while the passenger side stays icy. These are classic signs that your HVAC system needs a reset, not a repair.
Modern Silverado AC systems depend on electronic modules that control everything from compressor engagement to blend door positioning. Heat, power fluctuations, and software glitches can throw these modules out of sync. A proper reset clears error codes, reboots the climate control system, and recalibrates actuators. This guide walks you through four proven reset methods, how to spot problems that need actual repairs, and simple habits to keep your AC blowing cold for years.
Spot the Signs Your Silverado AC Needs a Reset

Inconsistent Temperature Output
If your cabin swings between hot and cold without you touching the controls, your HVAC module may be glitching. This happens often after long drives in extreme heat, when the system overheats and stores temporary fault codes.
Driver vs Passenger Side Temperature Differences
One of the clearest reset indicators is asymmetrical cooling: cold air on one side, warm air on the other. This almost always points to a blend door actuator that has lost its calibration. If your passenger window fogs up while you sweat, the AC hardware is fine; it is just misdirecting airflow.
Unresponsive Climate Controls
When fan speed, temperature, or mode buttons stop responding, the HVAC module may be frozen. A reset can reboot the system and restore full functionality, especially on newer models with touchscreen climate controls.
Try the Dashboard Button Sequence Reset

Press AC, Fan, and Recirculate Together
This method works on 2025 and select newer Silverado models experiencing software lockups. Perform it with the vehicle fully off:
- Turn the ignition to OFF or press the start/stop button until everything shuts down.
- Locate the AC, Fan Speed, and Recirculation buttons on your center console.
- Press and hold all three simultaneously for 10 to 15 seconds.
- Release and wait 30 seconds before restarting.
This sequence forces the HVAC module to reboot and clear soft error codes.
Verify the System Recovered
After starting the engine, set the AC to maximum cooling and highest fan speed. Listen for the compressor to click on. Check all vents for cold airflow. If cooling is still inconsistent, move to a deeper reset method.
Pro Tip: On dual-zone climate models, test driver and passenger temperature controls separately after the reset to confirm both sides respond.
Reset the AC Compressor Relay
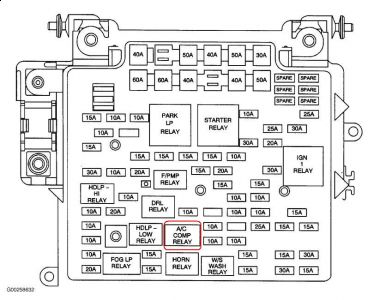
Locate the Under-Hood Fuse Box
Resetting the AC compressor relay is the most effective fix when your compressor won’t engage. The relay controls power to the compressor, and it can trip during heat spikes or voltage surges.
- Turn off the engine and open the hood.
- Find the main fuse box near the battery.
- Check the diagram on the lid for the AC Compressor Relay (often labeled “A/C CLUTCH”).
Remove and Reinsert the Relay
- Pull the relay straight out using your fingers or pliers, gripping the housing, not the pins.
- Inspect for burn marks, melted plastic, or corrosion. Replace the relay if you see damage.
- Wait 10 seconds with the relay removed to drain residual power.
- Push the relay firmly back into its socket.
Test for Cooling
Start the engine and turn the AC to maximum. The compressor should engage within 30 seconds. If cold air returns, the reset worked. If not, you may be dealing with low refrigerant or a failed compressor.
Warning: If the compressor clicks on and off rapidly, shut off the engine. This usually means low refrigerant, and running the compressor can destroy it.
Perform a Full Battery Disconnect Reset

Disconnect the Negative Terminal First
When other resets fail, a full battery disconnect clears all temporary memory in your truck’s computers, including the HVAC module. This is the most thorough option and often fixes stubborn actuator problems.
Tools needed: 10mm wrench, gloves, eye protection.
- Turn off the vehicle completely.
- Open the hood and locate the battery.
- Loosen and remove the negative (-) terminal first.
- Then remove the positive (+) terminal.
Safety First: Always disconnect negative first to avoid short circuits.
Wait 10 to 30 Minutes
Let the vehicle sit for at least 10 minutes. For persistent blend door issues, wait 30 minutes to ensure all capacitors fully discharge and memory clears.
Reconnect and Calibrate
- Reconnect the positive (+) terminal first, then the negative (-).
- Tighten both connections securely.
- Turn the ignition to ON without starting the engine.
- Do not touch any climate controls.
- Wait 60 seconds. Some models prompt you to roll the driver’s window down and back up; complete this step if requested.
This phase lets the system recalibrate blend doors and sensors.
Start and Test the AC
Start the engine and set the AC to lowest temperature and highest fan speed. Let it run for 3–5 minutes to purge warm air and stabilize cooling. Confirm consistent cold airflow on both sides.
Note: After a battery reset, you may lose radio presets and seat memory. Have your radio code handy if needed.
Reset the HVAC Actuator via Fuse
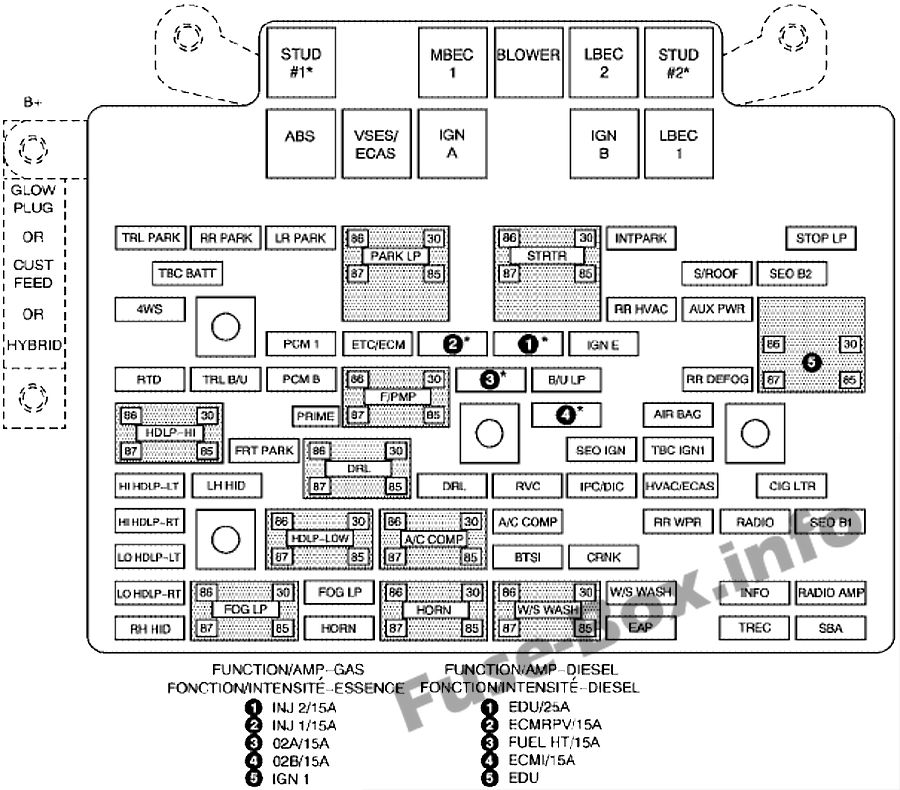
Find the HVAC Actuator Fuse
This method targets blend door actuators directly, the most common cause of dual-zone temperature problems. The fuse is usually in the interior fuse box under the dash near the driver’s knee.
- Turn off the truck.
- Check your owner’s manual for the HVAC Actuator or Climate Control fuse location.
- Pull the fuse out completely.
Reinsert After 10 Seconds
- Wait 10 seconds with the fuse removed.
- Reinsert it firmly into the socket.
Allow 40-Second Calibration
- Start the vehicle and do not touch any climate controls.
- Wait 40 seconds while the system recalibrates the blend doors.
- Adjust temperature settings and verify both sides respond correctly.
If the driver’s side still blows warm air while the passenger side stays cold, the actuator may be physically damaged and need replacement.
Diagnose Problems That Won’t Fix with a Reset

Watch for Mechanical Failure Signs
A reset cannot fix mechanical issues. Look for these warning signs:
- Clicking or grinding noises from behind the dash point to a failed blend door actuator.
- No cold air at all suggests a refrigerant leak or dead compressor.
- Musty odor indicates mold in the evaporator core.
- Weak airflow means a clogged cabin filter or failing blower motor.
Use This Symptom Guide
| Symptom | Likely Cause | Action |
|---|---|---|
| Warm air on one side | Failed blend door actuator | Replace actuator |
| No cold air, all vents | Low refrigerant or compressor failure | Professional leak test |
| AC cuts out after 10 mins | Overheating compressor or pressure switch | Check refrigerant levels |
| Musty smell | Mold in HVAC system | Clean evaporator or replace cabin filter |
| Clicking sound | Stripped actuator gear | Replace actuator |
Cost Note: Actuator replacement averages $425 at an independent shop versus $900 at a dealer based on 2014–2022 model data. Some actuators can be replaced by removing just the glove box and radio, avoiding full dash disassembly.
Prevent Future AC Problems
Run the AC Weekly, Year-Round
Even in winter, run your AC on defrost mode at maximum cold and highest fan speed for 10 minutes each week. This habit:
- Lubricates the compressor
- Maintains refrigerant pressure
- Prevents mold and seal drying
Skipping this routine is a leading cause of premature AC failure.
Replace the Cabin Air Filter on Schedule
A clogged filter restricts airflow and overworks the entire system. Replace it every 12,000 to 15,000 miles, or every 6–12 months.
Warning: A dirty cabin filter is the number one cause of reduced cooling performance and is often mistaken for a major AC failure.
Schedule Annual Professional Inspections
Have your AC system checked yearly for refrigerant levels, hose integrity, compressor clutch function, and condenser cleanliness. Catching small leaks early can save hundreds in repair costs.
Know When to Call a Professional
If your Silverado still won’t cool after all reset attempts, it is time for expert diagnosis. Persistent issues likely involve:
- Refrigerant leaks requiring a dye test and repair
- Compressor failure, which is expensive but necessary
- Blower motor or resistor failure
- HVAC control module replacement
Diagnostic fees average $200, refrigerant recharges run around $235, and hose repairs cost near $350.
Rule of Thumb: If the compressor doesn’t click on when AC is engaged and the relay and fuses are good, seek professional diagnosis immediately.
Frequently Asked Questions About Resetting AC on Chevy Silverado
Will disconnecting the battery reset the AC?
Yes, a full battery disconnect clears all temporary memory in the HVAC module and forces a complete recalibration. This is the most thorough reset method and often resolves stubborn blend door and temperature issues.
How long do I need to wait after disconnecting the battery?
Wait at least 10 minutes for a standard reset, or 30 minutes for persistent blend door actuator problems. This ensures all capacitors fully discharge and the system memory clears completely.
Why is one side of my Silverado blowing hot air while the other is cold?
This almost always indicates a blend door actuator that has lost calibration or failed mechanically. The passenger side works fine while the driver’s side misdirects airflow, which is why you may see fogging on the passenger window.
How much does it cost to replace a blend door actuator?
Independent shops typically charge around $425, while dealers may quote up to $900. Some 2014–2022 models allow actuator replacement by removing only the glove box and radio, avoiding full dashboard disassembly.
Can I reset my Silverado AC without disconnecting the battery?
Yes. Try the dashboard button sequence (holding AC, Fan, and Recirculate for 10–15 seconds) or the compressor relay reset first. These methods resolve most electronic glitches without affecting your radio presets or seat memory.
Why does my AC work for a while then stop blowing cold?
This usually indicates low refrigerant or an overheating compressor. The system may engage briefly, then shut down via a pressure switch to protect the compressor. A professional leak test is recommended.
Key Takeaways for Resetting Your Silverado’s AC
Start with the dashboard button sequence or compressor relay reset; both take under 15 minutes and resolve most electronic glitches. If those fail, move to the full battery disconnect or HVAC fuse reset for deeper recalibration. A reset fixes software and calibration issues, but it cannot repair mechanical failures like dead compressors, refrigerant leaks, or physically damaged actuators.
Your next step is simple: identify your symptoms using the guide above, try the matching reset method, and run your AC weekly to prevent future problems. With proper maintenance and timely resets, your Silverado’s AC will keep you cool for years to come.



