
A persistent Check Engine Light and trouble codes P0332 or P0327 on your Chevy Silverado usually point to a failing knock sensor. This small component monitors engine combustion and tells your ECU to adjust timing, protecting your engine from harmful pre-ignition. When it fails, you’ll notice reduced power, worse fuel economy, and that annoying light that won’t quit. The repair varies dramatically by model year, with older trucks requiring intake manifold removal and newer models offering quick external access. This guide walks you through each generation so you can save up to $200 in labor costs and get your truck running right.
Below you’ll find generation-specific procedures, exact torque specs, tool lists, and pro tips to avoid the costly mistakes that send DIYers back to the shop.
Identify Your Silverado’s Engine Generation

Before grabbing any tools, you need to know which engine generation you’re working with. The sensor location and repair complexity changed significantly between model years.
1999–2006 Models: Valley-Mounted Sensors (High Complexity)
On Gen III 5.3L V8 engines, the knock sensors sit underneath the intake manifold in the engine valley. This location makes replacement labor-intensive, but it’s also why these sensors fail so often. Over 95% of P0332 codes on these models trace back to the sensor or its heat-damaged wiring harness. Plan for a full afternoon and budget extra time if this is your first time removing an intake manifold.
2007–2013 Models: External Block Mount (Low Complexity)
Gen IV engines relocated the sensors to the side of the engine block, just above the oil pan rail. No intake removal needed, no major disassembly required. The repair takes under 30 minutes per side, and the wiring harness is far more durable than older generations. You’ll only need to replace the harness if it’s visibly cracked or damaged.
2014–2018+ Models: Dual-Side Access (Moderate Complexity)
Gen V (ECOTEC3) engines use two sensors in different locations:
– Passenger side: Mounted above the starter motor
– Driver side: Positioned above the differential
This setup requires starter removal on the passenger side and tight wheel-well access on the driver side. The starter heat shield bolt frequently goes missing on these models, so inspect it carefully and replace if damaged.
Gather Required Tools and Parts
Having everything ready before you start prevents frustrating mid-job trips to the parts store.
Universal Essentials for All Model Years
- Safety glasses and gloves
- Ratchet with short and long extensions
- 1/4-inch and 3/8-inch drive torque wrenches
- Flathead screwdriver
- Hose clamp pliers and vice grips (use with a rag to protect hoses)
- Compressed air with blow gun
- OBD2 scanner for clearing codes post-repair
- Rags for catching fuel and coolant spills
Model-Specific Tools and Parts
For 1999–2006 Models:
– 8 mm, 10 mm, and 22 mm sockets
– Fuel line release tool
– New intake manifold gaskets (OEM recommended)
– Knock sensor wiring harness set (critical due to brittle insulation)
– Dielectric grease for connectors
– Blue Loctite (optional, for intake bolts)
For 2007–2013 Models:
– 10 mm or 13 mm socket (varies by year)
– No major disassembly required
For 2014–2018+ Models:
– 10 mm and 13 mm sockets
– Floor jack, jack stands, and wheel chocks
– Trim tool set for splash shield removal
– Replacement starter heat shield bolt if missing
Recommended Parts
Stick with AC Delco or genuine GM sensors only. Aftermarket units often fail within months. On 1999–2007 models, replace both sensors as a pair even if only one code appears. They share the same heat exposure and age, so the second sensor isn’t far behind. Have coolant ready for top-off after reassembly.
Replace the Knock Sensor: 1999–2006 5.3L V8
This procedure requires intake manifold removal. Take your time and follow each step carefully.
Depressurize the Fuel System
- Locate the fuel pump relay in the underhood fuse box on the driver’s side.
- Remove the relay and crank the engine until it stalls. This drains fuel pressure.
- Find the Schrader valve on the fuel rail. Place a rag over it and press the center pin to release residual pressure.
- Reinstall the cap immediately.
Warning: Skipping this step risks high-pressure fuel spray, which creates a serious fire hazard.
Remove Air Intake and Throttle Body Components
- Unbolt the engine cover using a single 8 mm bolt and set it aside.
- Disconnect the air intake ducting by loosening two 8 mm hose clamps, releasing the coolant line clip, and pulling the line free.
- Remove the entire duct assembly.
- Disconnect the throttle body coolant lines using hose clamps and vice grips (wrapped in a rag) to minimize coolant spill. Catch fluid with rags.
- Unplug the throttle body electrical connector by pressing the gray clip down and pulling it free.
- Remove the back plastic cover using three 10 mm bolts. One bolt sits in a tight space, so use a wrench for better access.
- Blow debris away from the intake manifold surface using compressed air. This prevents dirt from falling into the engine when you remove the manifold.
Disconnect Fuel Injectors and Electrical Lines
- Unplug all eight fuel injectors by prying back the gray plastic clip and pulling up to disconnect. Immediately reinstall each clip onto the injector to avoid losing them.
- Note the injector tab orientation: driver’s side tabs face back, passenger side tabs face forward.
- Remove the ten 8 mm intake manifold bolts. Bolts #5 and #10 near the firewall are tight, so use a short extension. Count all bolts as you remove them.
- Unplug key connectors including the MAP sensor at the rear, the alternator, and the EVAP line.
- Disconnect the fuel line using the release tool. Position the tool, slide it under the collar, push the tabs inward, twist slightly, and pull off. Route the EVAP line under the fuel line to keep the path clear.
Remove the Intake Manifold and Replace Sensors
- Lift off the intake manifold carefully.
- Place rags in the intake ports to block debris entry.
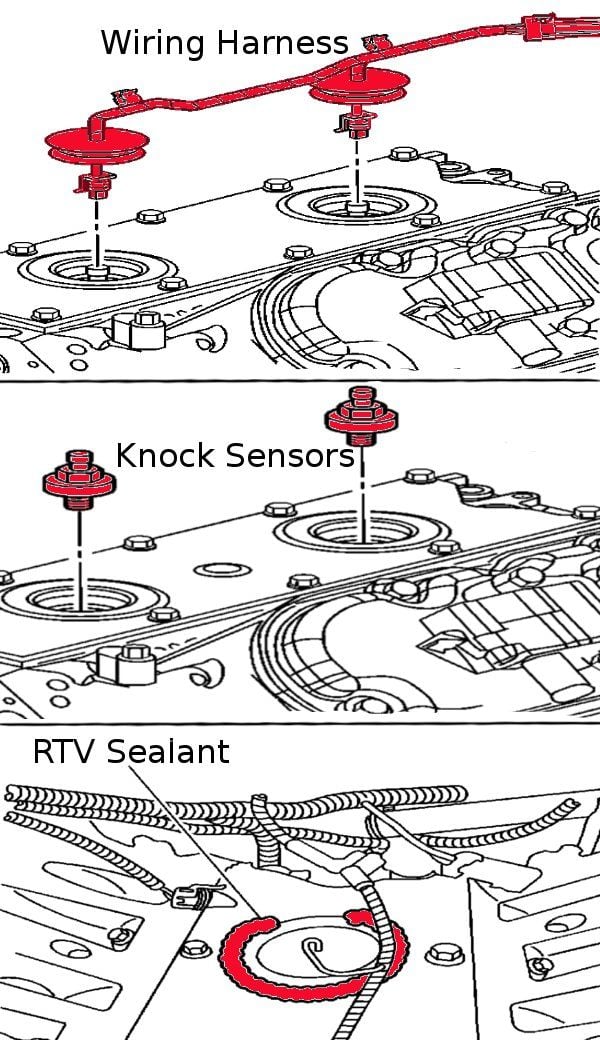
- Locate the knock sensors under rubber plugs in the engine valley and pull up the plugs to expose them.
- Disconnect the electrical connector and use a 22 mm socket to unscrew the old sensor.
- Install the new wiring harness by feeding it through the valley opening, guiding it down, and clicking the connector into place. Slide the rubber gasket down to seal the joint.
- Install the new sensor by hand-threading first, then torquing to 15 ft-lbs. Do not overtighten.
- Secure the wire with the plastic clip.
Reassemble the Intake Manifold
- Clean both mating surfaces by scraping old gasket material with a razor (scrape away from bolt holes) and vacuuming all debris.
- Install new gaskets or reuse if they’re in pristine condition.
- Lower the intake manifold while ensuring no wires are pinched.
- Thread all ten bolts finger-tight.
- Torque in two stages using a crisscross pattern: first pass at 44 in-lbs, second pass at 89 in-lbs.
- Apply blue Loctite to bolt threads if desired.
Pro Tip: Never skip the crisscross pattern. Uneven tightening warps the manifold and causes vacuum leaks.
Reconnect All Systems
- Reattach the EVAP line, PCV hose, and brake vacuum line.
- Reconnect the alternator and MAP sensor connectors.
- Plug in the knock sensor harness.
- Reconnect all eight fuel injectors by aligning tabs correctly and pushing down until you hear a click.
- Reinstall the plastic cover with three 10 mm bolts.
- Reconnect the throttle body lines and electrical connector.
- Reinstall the air ducting and engine cover.
- Top off the coolant.
Replace the Knock Sensor: 2007–2013 5.3L V8
This is the easiest generation to work on.
Disconnect the Battery
- Remove the negative terminal using a 10 mm socket.
- Secure the cable away from the battery post.
Access and Replace the Sensor
- Locate the sensor on the engine block above the oil pan. The passenger side sits near the dipstick tube, and the driver side sits in front of the oil filter.
- Unclip the wiring harness from the sensor.
- Remove the center bolt using a 10 mm or 13 mm socket.
- Pull out the old sensor and install the new one by hand-tightening first.
- Torque to 18 ft-lbs.
- Reconnect the harness and battery.
The entire job takes less than 30 minutes per side. The wiring harness rarely needs replacement unless it’s visibly damaged.
Replace the Knock Sensor: 2014–2018+ 5.3L V8

These models require more access work but still avoid intake disassembly.
Disconnect the Battery
- Remove the negative terminal using a 10 mm socket.
- Secure the cable to prevent accidental contact.
Replace the Passenger Side Sensor (Above Starter)
- Access the starter from under the vehicle using jack stands.
- Disconnect the electrical connector and power cable.
- Remove the two 13 mm bolts securing the starter and pull it out of the bell housing.
- Inspect the heat shield bolt and replace it if missing or damaged.
- Pull down the rubber cover over the sensor.
- Unlock the connector by pulling back the red locking tab, pressing the black button, and disconnecting.
- Remove the 13 mm bolt securing the sensor and note its orientation.
- Install the new sensor in the same position and torque to 18 ft-lbs.
- Reconnect the harness by pushing until it clicks, confirming the lock, and closing the red tab.
- Slide the boot over the connector.
- Reinstall the starter with two 13 mm bolts torqued to 37 ft-lbs.
- Reattach the power cable nut to 80 in-lbs and reconnect the electrical connector.
Replace the Driver Side Sensor (Above Differential)
- Remove the front driver-side wheel.
- Take off the inner splash shield using trim tools.
- Locate the sensor above the differential and remove the 13 mm heat shield bolt.
- Unplug the connector by pulling back the red tab, pressing the black tab (use a flat tool if needed), and disconnecting.
- Remove the 13 mm sensor bolt.
- Install the new sensor matching the original orientation and torque to 18 ft-lbs.
- Reconnect the harness, then reinstall the heat shield and wheel.
Pro Tip: Face the truck bed and reach backward through the triangular opening. This position gives you better leverage on the heat shield bolt.
Torque Specifications Reference
| Component | Torque Spec | Notes |
|---|---|---|
| Knock Sensor (1999–2006) | 15 ft-lbs | Use 22 mm socket |
| Knock Sensor (2007+) | 18 ft-lbs | 10/13 mm bolt |
| Intake Manifold (Pass 1) | 44 in-lbs | Crisscross pattern |
| Intake Manifold (Pass 2) | 89 in-lbs | Final torque |
| Starter Bolts | 37 ft-lbs | 2014+ models |
| Starter Power Nut | 80 in-lbs | Prevents arcing |
| Throttle Body Nuts | 89 in-lbs | 1999–2006 models |
Validate the Repair After Completion
Clear Codes and Complete a Drive Cycle
- Use an OBD2 scanner to clear the P0332 and P0327 codes.
- Complete a 40–45 minute drive cycle that mixes city and highway speeds, including idle, acceleration, and cruise.
- Emissions monitors reset only after a full drive cycle, so this step is required for state inspection.
Check for Leaks and Loose Connections
- Inspect fuel lines for drips after the engine runs.
- Check the coolant level and top off if low.
- Tug-test all connectors including the knock sensor, MAP sensor, and injectors.
- Verify bolt tightness on the intake, starter, and heat shield.
Avoid These Common Repair Mistakes
Debris in intake ports: Always plug intake ports with rags during manifold removal. A single bolt or speck of dirt dropped into a cylinder can cause catastrophic engine damage.
Over-torquing the sensor: Knock sensors are piezoelectric components. Over-tightening cracks the element or strips the threads. Use a torque wrench every time: 15 ft-lbs max for older models, 18 ft-lbs for newer ones.
Skipping the wiring harness: On 1999–2006 models, always replace the harness with the sensor. Brittle, heat-cracked insulation leads to repeat failures within months.
Ignoring the heat shield bolt: On 2014+ models, the starter heat shield bolt often breaks or goes missing. Replace it to prevent heat and vibration damage to the starter and wiring.
Reusing damaged gaskets: While some DIYers successfully reuse intake gaskets, new OEM gaskets prevent vacuum leaks. If the gaskets are cracked or compressed, replace them.
Frequently Asked Questions About Knock Sensor Replacement
How long does it take to replace a knock sensor on a Chevy Silverado?
On 1999–2006 models requiring intake manifold removal, expect 3–5 hours for a first-time DIYer. Experienced mechanics complete it in about 2.5 hours. On 2007–2013 models, the job takes less than 30 minutes per side. On 2014–2018+ models, plan for 1–2 hours including starter removal and wheel-well access.
Can I drive my Silverado with a bad knock sensor?
You can drive short distances, but it’s not recommended. A failing sensor causes the ECU to retard timing, which reduces power and fuel economy. More importantly, you lose protection against actual engine knock, which can damage pistons and bearings over time. Address the issue as soon as possible.
Do I need to replace both knock sensors at the same time?
On 1999–2007 models, yes. Both sensors share the same heat exposure and age, so if one fails, the other isn’t far behind. On 2007+ models with external sensors, you can replace just the failed sensor unless the other shows visible damage.
What causes knock sensors to fail on Silverados?
The primary culprit is heat exposure. On Gen III engines, the sensors sit in the engine valley where temperatures are extreme. The wiring harness insulation also becomes brittle and cracks over time. On newer models, heat and vibration are still factors, but the sensors are more durable due to better materials and external mounting.
Will replacing the knock sensor clear my Check Engine Light?
Replacing the sensor fixes the underlying problem, but you’ll still need to clear the code with an OBD2 scanner. After clearing, complete a full drive cycle to reset the emissions monitors. If the light returns, check for wiring issues or a faulty connection.
What’s the difference between P0327 and P0332 codes?
P0327 indicates a problem with Knock Sensor 1 (typically the driver’s side), while P0332 indicates Knock Sensor 2 (typically the passenger side). Both codes point to low input voltage, which usually means a failed sensor or damaged wiring. The diagnostic and repair process is the same for both codes.
Final Thoughts on Replacing Your Silverado’s Knock Sensor
Tackling a knock sensor replacement on your Chevy Silverado saves significant money and gives you a deeper understanding of your truck. The three key takeaways are: identify your generation before starting, use a torque wrench to avoid cracking the new sensor, and replace the wiring harness on 1999–2006 models to prevent repeat failures. With the right tools, quality OEM parts, and this step-by-step guide, you can complete this repair confidently in your driveway. Once finished, clear the codes, run a full drive cycle, and enjoy restored performance and fuel economy.



