
Few things are more frustrating than hopping in your Chevy Silverado at night, shifting into Reverse, and realizing nothing lights up behind you. This issue affects Silverado owners across model years, from late 1990s trucks to 2014+ models, and the causes range from a simple blown fuse to complex electrical failures. The tricky part? The most common culprit, the TBC-2B (15A) fuse, often looks perfectly fine even when it’s failed internally.
Driving without functional reverse lights is more than an inconvenience. It’s a real safety hazard during nighttime maneuvers and can cause your truck to fail inspections in some states. The good news is that most reverse light problems can be diagnosed and repaired at home with basic tools. This guide walks you through every major failure point, from fuses and switches to wiring, relays, and grounds, so you can get your backup lights working again.
Start With the TBC-2B Fuse
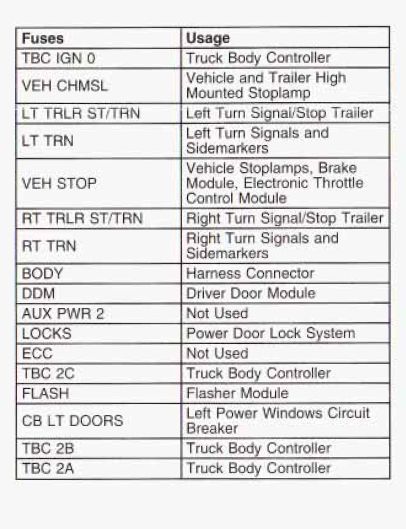
The TBC-2B (15A) fuse is the number one cause of failed reverse lights in Silverados, especially models from 2000 to 2010. Skipping this check can cost you hours of unnecessary troubleshooting.
Why This Fuse Fails Without Looking Broken
This interior fuse powers both your reverse lights and your interior dome lights. If both stopped working at the same time, that’s a strong clue. However, the fuse commonly fails internally, meaning the filament appears intact to the eye but has actually broken beneath the surface. Visual inspection alone will mislead you.
Action steps:
– Locate the interior fuse panel near the driver’s left knee.
– Identify the TBC-2B (15A) fuse using the diagram on the panel cover.
– Remove the fuse and test it with a multimeter for continuity.
– Replace with a new 15A fuse if continuity is absent.
After installation, test both your reverse lights and dome lights. If both come back on, you’ve solved the problem in under 10 minutes.
Verify Power at the Fuse Terminals
Even when a fuse tests good, confirm power is reaching both sides of the slot with the key on and shifter in Reverse.
How to test:
– Use a test light or multimeter to probe both terminals.
– If one side shows power and the other doesn’t, the fuse is faulty even if it looks fine.
– If both sides show power, the problem lies downstream in the wiring, switch, or relay.
Test the Backup Light Switch (PNP Switch)

When the fuse checks out, the next suspect is the Park/Neutral Position (PNP) switch, also called the transmission range switch. This component signals the truck that it’s in Reverse and triggers the backup lights.
Locate and Test the PNP Switch
On Silverados from 1999 onward, this switch mounts on the driver’s side of the transmission. Older models may have it on the steering column or shifter assembly.
Testing procedure:
1. Turn the key to ON with the engine off.
2. Shift into Reverse.
3. Disconnect the switch connector.
4. Probe the terminals with a test light or multimeter:
– One terminal should show 12V input power.
– The other should show power only when in Reverse.
Interpreting results:
– No power at input means the wiring back to the fuse is the issue.
– Power in but no power out indicates a faulty switch or poor actuation.
– Power out means the problem is in the rear wiring or ground connection.
Watch for TSB 01-07-30-021 Issues
GM issued Technical Service Bulletin 01-07-30-021 covering 1995–2001 models. Heat can melt the sealant inside the PNP switch, creating an open circuit and fusing the connector to the switch body.
Warning signs:
– Intermittent or total reverse light failure.
– Connector won’t separate from the switch easily.
– Discolored or brittle wires near the connector.
Correct fix: Replace both the switch and connector together. The wires are identical in color, so use the old connector as a wiring guide. Seal all connections with heat-shrink tubing and dielectric grease to block moisture intrusion.
Inspect the Shifter Nub Mechanism

Sometimes the PNP switch is perfectly fine, but a mechanical issue prevents it from being activated. That’s where the shifter nub comes in.
A Worn Nub Silently Breaks the Circuit
Inside the shifter housing, a small plastic nub physically pushes the reverse switch plunger when you shift into Reverse. Over years of use, this nub wears down or breaks off entirely.
Symptoms:
– A brand-new PNP switch doesn’t restore functionality.
– Power reaches the switch but never exits it.
– Manually pressing the switch plunger makes the lights work.
Diagnostic approach:
– Remove the center console to access the shifter assembly.
– Shift into Reverse and observe whether the nub makes contact with the switch.
– If there’s no contact, the nub has worn down.
Available solutions:
– Install a manual toggle switch wired directly to the reverse light circuit as a temporary bypass.
– Replace the entire shifter assembly if rebuild parts aren’t available.
– Some owners 3D-print or epoxy a replacement nub, though full replacement is more reliable.
Diagnose Relay and Junction Block Failures (2007–2014 Models)

On newer Silverados, the reverse light circuit uses an embedded relay inside the under-hood fuse block. There’s no standalone relay you can pull out and replace.
The Hidden Relay Inside the Junction Block
This PCB-based relay is controlled by the Body Control Module (BCM) and fires after receiving a signal from the Transmission Control Module (TCM).
Symptoms of failure:
– Fuses and switch test good.
– No power reaches the rear lights or trailer reverse circuit.
– Headlights flicker when hitting bumps, suggesting grounding instability.
Diagnostic method:
– Swap the entire under-hood junction block with a known good unit from a compatible vehicle like a Tahoe.
– If reverse lights work after the swap, the original block is faulty.
Part reference: GM Part # 22798217 (Engine Wiring Harness Junction Block).
Programming May Be Required
Owner feedback on programming is mixed:
– Some report successful plug-and-play swaps.
– Others say a dealer scan tool is needed to initialize the BCM.
Pro tip: Check owner forums for your specific model year. Police PPV (Police Patrol Vehicle) models often allow direct swaps without reprogramming.
Fix the Engine-to-Firewall Ground Strap

A broken engine-to-firewall ground strap is an overlooked cause of relay and fuse block failure in 2007 and newer trucks.
How a Bad Ground Destroys Your Relay
This strap grounds the engine to the chassis. When it cracks or breaks from vibration, electrical current seeks alternate paths. Voltage spikes occur, especially when revving or hitting rough roads, and these surges commonly fry the backup light relay embedded in the junction block.
Warning indicators:
– Reverse lights fail after other electrical issues appear.
– Headlights flicker during acceleration or on bumpy roads.
– Battery light flickers or the charging system behaves erratically.
Repair steps:
1. Locate the ground strap at the front of the engine, attached to the firewall.
2. Inspect for corrosion, cracks, or loose mounting bolts.
3. Replace with a new strap or add a 10-gauge auxiliary ground wire.
4. Clean mounting points down to bare metal for solid contact.
Critical reminder: Always repair the ground before replacing the junction block, or the new unit will fail prematurely.
Trace Wiring and Check for Corrosion
When fuses, switches, and relays all check out, the problem is likely in the wiring or connectors, especially on older trucks or those exposed to road salt.
Clean the Junction Box and Fuse Block
Corrosion accumulates on fuse block terminals, both on top and underneath.
Cleaning process:
– Disconnect the battery before starting.
– Remove the under-hood fuse block (this may require removing the wiper cowl).
– Inspect all connectors underneath for green corrosion or moisture.
– Scrub with a plastic bristled brush and electrical contact cleaner.
– Apply dielectric grease before reassembly.
This straightforward cleanup has resolved intermittent reverse light issues for many owners.
Test the Frame-to-Bed Harness
This connector delivers power from the chassis to the truck bed tail lights.
How to test:
– Crawl under the rear of the truck.
– Find the large multi-pin connector on the driver’s side near the bumper.
– Disconnect it and shift into Reverse.
– Test for power on the chassis side of the connector.
Interpreting results:
– Power present means the problem is in the bed harness or tail light assembly.
– No power means the issue is forward, in the switch, relay, or fuse block.
Also inspect for melted pins or moisture inside the connector. Clean thoroughly and reseal with dielectric grease.
Verify Grounds at the Tail Lights
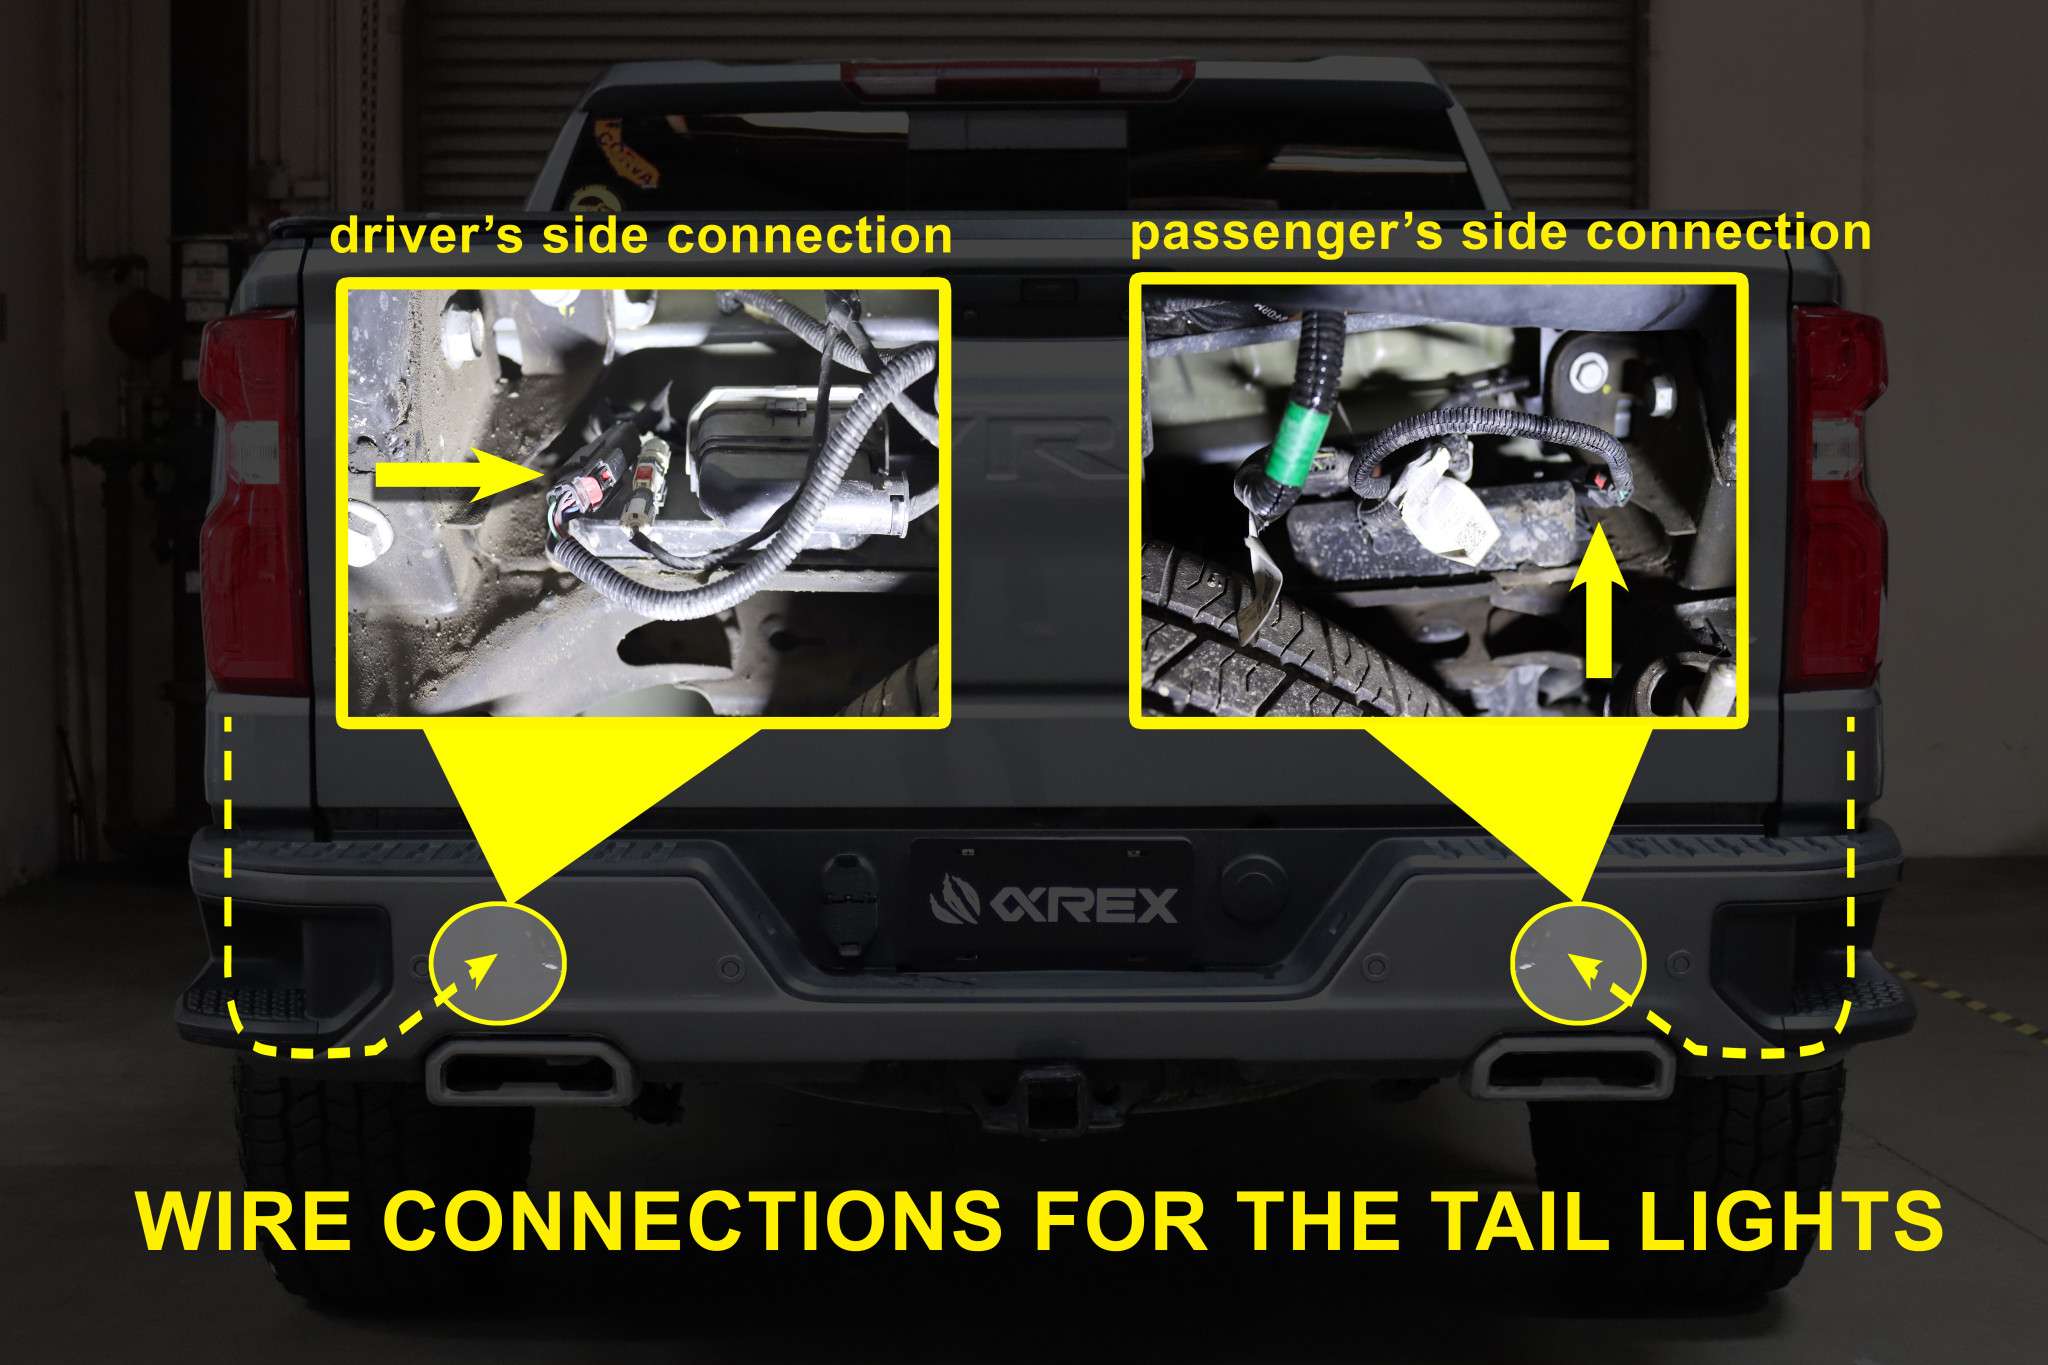
Poor grounding causes dim or non-functional lights even when power is reaching the socket.
Check the Rear Ground Point
On the driver’s side behind the bumper, a ground wire runs from the rear distribution block to the frame.
Testing procedure:
– Remove the ground wire and clean the contact point.
– Scrape away rust and paint until bare metal is exposed.
– Reattach securely and test voltage at the reverse light socket.
– A reading of 12–14V with the engine running indicates good ground.
– A reading near 6V indicates a bad ground or high-resistance wire.
Pro tip: If the original ground is corroded beyond repair, run a new ground wire directly from the tail light housing to the frame.
Troubleshoot Aftermarket Upgrades
Aftermarket parts like LED taillights or backup cameras can interfere with the reverse light circuit.
LED Taillights Not Working in Reverse
LEDs draw less power than standard bulbs and sometimes confuse the BCM, though this is more common with turn signals than reverse lights.
Diagnostic steps:
– Verify power at the socket with a test light.
– No power means the issue is vehicle-side (fuse, switch, or wiring).
– Power present means check the LED harness pinout. Some aftermarket units wire the reverse circuit incorrectly.
Backup Camera Causing Fuse Blows
Tapping into the light green reverse wire for a camera can overload the circuit.
Symptoms:
– The TBC-2B fuse blows shortly after camera installation.
– Reverse lights work after fuse replacement but fail again soon after.
Solution:
– Disconnect the camera wiring and check for shorts or exposed wires touching metal.
– Power the camera from a separate fused circuit rather than the reverse light wire.
Handle Intermittent and Unusual Failures
Some reverse light problems don’t follow the typical pattern but still have logical explanations.
Reverse Lights Activate with the Key Fob
On some 2003 Avalanche and Z66 models, reverse lights flash when unlocking the doors.
Cause: A faulty VUSE 27 relay in the interior fuse box.
Fix: Locate and replace the VUSE 27 relay.
One Light Dim or Flickering
If the driver-side reverse light is noticeably dimmer than the passenger side, the issue is likely:
– A corroded socket or connector on that side.
– A bad ground specific to that light.
– A partially broken wire in the harness.
Quick test: Swap bulbs between sides. If the dimness follows the bulb, replace it. If it stays on the same side, the problem is wiring or ground.
Frequently Asked Questions About Chevy Silverado Reverse Lights
What fuse controls reverse lights on a Chevy Silverado?
The TBC-2B (15A) fuse in the interior fuse panel controls reverse lights on most Silverados from 2000 to 2010. This same fuse also powers the interior dome lights, so failure of both systems simultaneously points directly to this fuse.
Why do my reverse lights work sometimes but not always?
Intermittent reverse light operation usually indicates a failing PNP switch, a loose connector, or a corroded ground point. Heat-related connector issues covered by TSB 01-07-30-021 are a common cause in 1995–2001 models.
Can a bad ground cause reverse lights to stop working?
Yes. A poor ground at the rear distribution block or tail light housing causes voltage drop, which can make lights dim or prevent them from lighting entirely. A reading of around 6V at the socket instead of 12–14V confirms a grounding problem.
How do I know if my reverse light switch is bad?
Test the PNP switch by checking for 12V input power and verifying that output power appears only when the shifter is in Reverse. If power enters the switch but never exits, the switch is faulty or not being mechanically actuated by the shifter nub.
Why do my Silverado reverse lights not work but my trailer lights do?
This usually means the issue is between the trailer connection and the tail lights, not in the front of the circuit. Check the frame-to-bed harness connector for corrosion or damage, and inspect the tail light ground connections.
Is it safe to drive with reverse lights not working?
Driving without functional reverse lights is unsafe, especially at night or in low-visibility conditions. It also increases the risk of failing a state vehicle inspection. Diagnose and repair the issue as soon as possible.
Key Takeaways for Restoring Your Silverado’s Reverse Lights
Most Chevy Silverado reverse light failures are fixable with basic tools and a methodical approach. Start by testing the TBC-2B fuse with a multimeter since visual inspection won’t catch internal failures. If the fuse is good, move on to the PNP switch, shifter nub, and ground connections. On 2007 and newer models, suspect the junction block relay and engine-to-firewall ground strap as prime candidates.
Throughout your diagnosis, clean every connector you encounter, apply dielectric grease to prevent future corrosion, and always verify both power and ground before replacing expensive components. With patience and the right approach, you can go from frustrated to fixed without an expensive trip to the dealership.



